Well it was a little more complicated that I thought it would be, but I'm excited to show you the finished product!
I wish I could show you the before pic, but a small problem with my laptop has made that impossible for the present moment. (Apparently 'system refresh', no matter how harmless sounding it is, is something you should NEVER do. I found out the hard way when I attempted to do a system restore to try to fix a problem I was having. I couldn't find restore, and 'refresh' sounded friendly and like something good to try. Um, no. I think I'll go back to having Mr. M. do all of my laptop maintenance from now on!). So anyway, if you want to see the before...I guess you'll just have to follow me on Instagram!
UPDATE: I've recovered from my mini-computer crash, and here's the before picture. Lovely, isn't it? The lady at Goodwill couldn't believe I was buying it!
So basically, I took an old hunting-camp-bound painting with a brown wooden frame and turned it into this beauty. First, I sprayed three coats of chalkboard paint inside the frame, and then I taped off the frame and spray painted it Rustoleum's Colonial Red gloss.
Believe it or not (and I'm inclined to go with not, because I'm no artist), the chalkboard art part of the project was not that hard. You probably recognize the message from one of my inspiration pictures. I drew the tree myself, and although it is no masterpiece and the branches need to be longer, I'm sort of proud of it! Drawing the text and the crow was way beyond my capabilities, so I used a simple trick to transfer those images onto the chalkboard. I simply printed out the words and the crow onto printer paper and cut them apart. Next, I rubbed chalk all over the back of each item and placed them where I wanted them on the chalkboard. I traced the images with a pencil, which transferred an outline of the letters and the crow onto the chalkboard! I used a wet cotton swab to clean up any areas that were smudged, and that was it! I couldn't believe how easy it was.
So creating the chalkboard was cheap (about $12 total) and easy. Getting the frame to hang on the refrigerator with magnets...not so much. In fact, making the chalkboard took about a day and a half....hanging it took almost two weeks....and a few more dollars. I didn't anticipate that, because I had purposely chosen a picture and frame that was very lightweight, for this very reason. I would estimate that the chalkboard weighs somewhere under 10 pounds.
My first thought was to use a roll of magnet tape that stuck to the back of the picture frame...
......which did not even come close to holding it up. But I was prepared for that, and had also purchased 52 button magnets, which I then hot glued to the back of the frame. Combined, these purchases cost me about $10. But even combined, they didn't work.
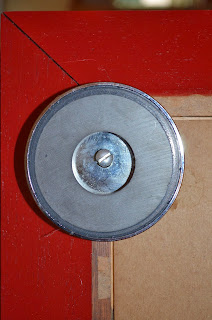
So I went back to the store and found these disc magnets that are supposed to hold 95 pounds each. Just to be safe, I bought two. They were $7 each.....
Luckily the miracle of the internet came through. I found four of the magnets online for $3 each and Amazon Prime took care of the free two-day shipping. I screwed each magnet to the back of the frame, and FINALLY we were in business!
Have you been keeping track? It took $36 to hang the chalkboard that it cost me $12 to make. Ugh. It's a good thing I love it! I can't wait until November rolls around so that I can change out the message for Thanksgiving!
Have you ever had a project that ended up costing way more than it should have? Have you ever fallen for the trap that is 'system refresh'?
Linking Up At


No comments:
Post a Comment