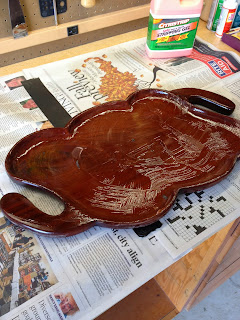
It all started with a trip my local Goodwill, where I picked up this cool tray for $5. The unique shape caught my eye immediately, and I knew it would be my next project. You see, I've been seeking out interesting trays for many of the tables in our house for some time, and have been disappointed in both the selection and the prices I have found. So for five bucks, bringing this baby home was a no-brainer.
I knew that I wanted to use the tray on our family room coffee table, and I also knew that I wanted part of the the tray to become gold. I've been dying to try gold leafing for EVER, and so I decided that this would be the perfect project to start with. Because I had never worked with gold leaf before, I wanted to make sure that I prepped the tray properly, in order to increase my chances of success. This was a project with multiple firsts, so with my husband's guidance, I used wood stripper to remove the finish from the tray. From this day forward, when someone types 'stripper' in my blog search box, I will now have a result to offer :)
 We used Citristrip, which lived up to its word of being both safe and effective. I painted a thin layer of stripper on the tray waited about 45 minutes, and then used a plastic scraper to scrape off the finish and some of the stain. It worked like a charm, and was really easy. The result:
A tray perfectly prepped for painting. I painted the entire tray with three layers of glossy black latex paint. I opted not to prime the tray, which allowed some of the wood-grain texture to peek through the paint. Check out my high-tech paint stands, aka paper bowls.
Once it was painted, I
I started by applying a thin layer of adhesive to the areas that I wanted to gold leaf....
...and once it had dried to the point of being tacky, I began to apply my leaf. To apply, I simply put a sheet of gold leaf on the tray, and used a dry foam brush to smooth it out. Smoothing out the gold leaf perfectly was not possible, but I think that is to be expected. I think part of the beauty of gold leaf lies in the texture and imperfections. I repeated until the entire tray was covered.
Once the tray was covered I used my dry foam brush to brush away the excess gold leaf. I used some of the excess flakes to patch any areas that were not covered, as there were a few seams where the black showed through. From there, I still had a few seams, and I spot-applied a second coat of adhesive to cover those. I'm not sure that was the best idea, as it left a few areas that were not as smooth as they had been initially. But, like I said, I think texture and imperfection are part of gold leafing. Then, I applied sealer to the entire gold-leafed area to protect the leaf from oxidizing, and it was done!
I'm pretty much in love with it. Here's a before and after pic.
And look how amazing it looks in our family room!
I'm still considering applying a coat of shellac to the whole thing to give it a perfectly smooth, glossy finish. I just need to do some research to make sure that doing so wouldn't damage or react with the gold leaf. In the meantime, it is looking gorgeous and holding up just fine.
The total cost breakdown for the project is:
Tray- $5
Gold Leaf Kit- $11.99
For a total of $16.99. Although I only used about half of the gold leafing kit, so if you want to split hairs, I guess you could say it cost about $11. Either way, it's definitely a thrifty up-cycle!
Have you up-cycled anything lately? Do tell!
It's Overflowing
Sweet Haute
Inspire Me Please Weekend Blog Hop
The Shabby Nest
504 Main
Tatertots and Jello
Get Your DIY On
Think Pink Sunday
Give Me the Goods Monday
The DIY'ers
Ginger Snap Crafts
Frugalicious Friday
Sweet Haute
Inspire Me Please Weekend Blog Hop
The Shabby Nest
504 Main
Tatertots and Jello
Get Your DIY On
Think Pink Sunday
Give Me the Goods Monday
The DIY'ers
Ginger Snap Crafts
Frugalicious Friday


Your tray turned out beautifully, and I laughed out loud at your stripper comment. Ha! Thanks for stopping by my blog earlier.
ReplyDeleteWow Em! All this talk about gold leaf and I had no clue what it meant. I was picturing gold leaves on your tray, no joke. I love how it turned out!!! I bet it is so fun to go into Goodwill and find things to upcycle- since you know how to do it!!
ReplyDeleteThat turned out very cool! Nice upcycle!
ReplyDeleteLove it! I hope you'll link up! http://www.dagmarbleasdale.com/2013/09/thrifty-vintage-finds-link-party-9/
ReplyDeleteDagmar
Dagmar's Home
Done! Thanks!
DeleteGreat tray Updo!
ReplyDeleteHi Emily! I'm glad I saw you at THINK PİNK SUNDAY :)
Kissesfromhome
http://kissesfromhome.com
Thanks! OMG I just checked out your blog, and your recipes sound delish! I quesadillas with mint yogurt sounds amazing!
DeleteLooks fantastic - so modern! Looks perfect in your living room.
ReplyDeleteYour gilded tray is so pretty! Great job! Thanks for sharing this post on Tickled Pink Times Two!
ReplyDeleteThis tray is seriously cool. What an awesome shape, and your redo made it so fabulous again!! Thank you so much for linking this up at the Get Your DIY On Fall Challenge: Spray Paint! We hope to see you come on back over this evening (7pm EST) and bring along a chalkboard project!!
ReplyDelete~Krista from the happy housie
This tray stole my heart. Really beautiful. What a great shape too!
ReplyDeleteThanks Carmody!! The shape is what drew me in as well!!
Delete