Showing posts with label wreaths. Show all posts

Wednesday, March 12, 2014

Spring Wreath Roundup


You guys know I LOVE me some wreaths....

Oh, you don't?  I've only talked about it here, here,  herehere and here.  

Ok.  So now that  you are all caught up.....

Here are some fabulous spring wreath inspirations!  I'm planning to DIY a spring wreath in the very near future, and I am overwhelmed by all of the amazing inspiration out there!

A Door-Able Wreath @Very Truly Me


Chartreuse Modern Wreath via Pinterest

Spring Burlap Wreath via Pinterest

DIY Succulent Wreath @Apartment Therapy

Spring Yarn Wreath via Pinterest

Spring Grapevine Wreath @Oh My Words

Spring Hydrangea Wreath via Pinterest

Garden Hose Spring Wreath via Pinterest

Robin's Egg Wreath @Uncommon Designs


Yarn Wrapped Spring Wreath via Pinterest

Wow!  So much inspiration!  I don't know how to choose which direction to go in.  Something about the  simple grapevine wreath really appeals to me, but I also love that robin's egg wreath too! And the one with the bunny and the coral flowers!! Perhaps my decision will rest upon what materials I can get my hands on in the next week or so....

I'll be sure to keep you up to date on my decision!

In the meantime, check out some of the other wreaths I've made!

My first-ever blog post showed off my twine wrapped monogram, grapevine hydrangea wreath, and the first of many burlap wreaths (get the tutorial here)....


I switched up my burlap wreath base to create a fun peacock wreath
.


Christmas time brought a fresh holiday wreath...

.....followed up by a winter white yarn wreath...


...which will be replaced with whatever I create for spring.  Can't wait to get started!!

Do you switch out your wreaths frequently?  What wreath base do you prefer (burlap, grapevine, etc.)??

Linking Up At


 photo signature_zps64b784cd.jpg

Thursday, January 23, 2014

Pom-Pom Wreath Tutorial


I've been eyeing up pom-pom wreaths on Pinterest for a while now, and Tuesday's snow day gave me the time I needed to make one of my own. Once Christmas is over, winter is a tough time for outdoor decorating, but this wreath seems perfect!  It reminds me of freshly fallen snow.

Best of all, like my burlap wreath, it's a perfect blank canvas for almost any embellishments that I want to add, making it incredibly versatile.  Imagine it with pink and red for Valentine's Day, aqua in the summer, or black and orange for Halloween!  

To create this pom-pom wreath, I used one large skein (1077 yards) of white yarn and an embroidery hoop.   Initially, I wanted to choose super fluffy yarn to create a thick, full wreath, but the fluffy yarn was going to run me about $20, while the yarn that I bought cost only $5.97, so I quickly adjusted my plan.  Combined with the 49 cents that I spent on the embroidery hoop, the cost of this wreath came in under $6.50.  

Basically, all that is needed to create this fun, fluffy wreath are dozens and dozens of yarn pom-poms.  Creating the pom-poms was pretty mindless, which allowed me to work while hanging out with my BFF, Netflix.  I'm pretty sure that binge-watching episodes of One Tree Hill while you work is a key to success, but I'm pretty sure that Dawson's Creek, 90210, or Gossip Girl would suffice.

Yes, I'm a grown woman who loves teen dramas.  Don't judge.

To make yarn pom-poms, start by placing one end of the yarn through the opening between your ring and middle fingers, and leaving a 4-5 inch end of yarn hanging out over by your thumb.  


Wrap the yarn around your fingers 75 times.

 And then use the end piece of yarn that you left hanging by your thumb to wrap around the center of the loops, using it to cinch the loops, and tie it tight. 


Then, use scissors to cut the loops, and you have a pom-pom.  Fluff it up and trim any uneven ends, if necessary (I didn't really have to do this).  


Once you have a bunch of pom-poms, tie them onto the embroidery hoop to create a wreath. There was no special technique here, I simply tied the pom-poms right onto the hoop.


Continue the entire way around the embroidery hoop.  Finish by fluffing the pom-poms and snipping off any long strings.  

Now time for the eye candy!


I finished my wreath off with a glittery monogram, of course!


Would you try a pom-pom wreath?  What guilty-pleasure show would you watch while you made one?

Linking Up At
Get Your DIY On
The DIY'ers
Inspire Me Please Weekend Blog Hop
ShareYour Creativity

 photo signature_zps64b784cd.jpg

Wednesday, December 11, 2013

TKO (Total Knock-Off)

Hey there!  I love a good knock-off (especially when it means I can make a JT reference), but what I really love is a free knock-off.  So when I saw this cool boxwood wreath that spelled out JOY at Marshall's last weekend, I immediately developed a plan to make it myself.


Once I had the idea, I had to wait a few days to find the right materials.  Lucky for me, Mr. M. and I decided to forgo buying Christmas gifts for each other in exchange for snatching up a Cyber-Monday deal on a flat screen that we can both enjoy in our bedroom.  It was like three gifts in one!  New TV, new space to decorate now that we free up a surface by mounting the TV on the wall, AND I knew that the box it came in would be a perfect template for my new project!  

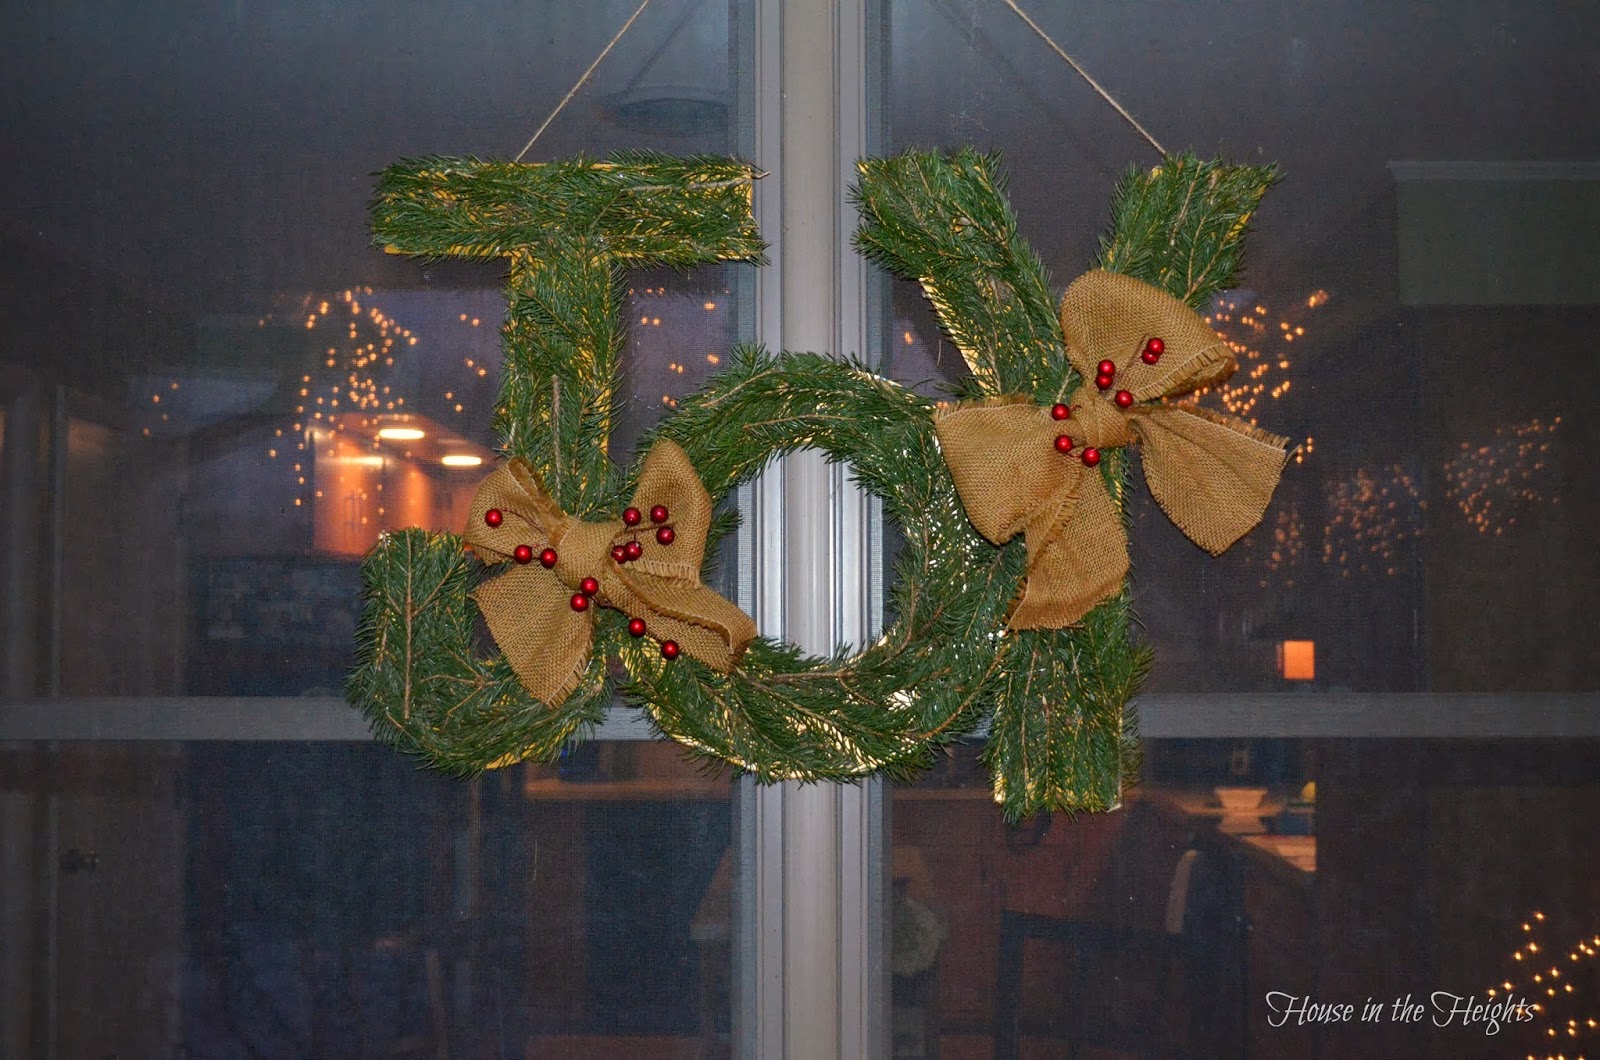
Once we were sure that the TV worked properly, I got right to cutting that baby apart!  I knew that I wanted to hang my wreath on the kitchen window, so I cut the word JOY out in reverse, so that the plain cardboard side would be what we could see through the window.


Then, I threw two coats of gold craft paint on the front of the letters, so that letters and pictures on the packaging would not be what peeked through the greens.  And by 'threw the paint on', I really mean that I squeezed some paint right on the surface and smeared it around. I didn't really care about my paint job, since it would be getting completely covered up.  

Here it is after one coat.  I clearly needed another.

Then, I cut some more greens from one of our pine trees and hot glued the branches on top of the letters.  It took some time and patience to make the branches bend into that shapes that I needed, but it was not hard.  I did lose some skin on my fingertips using the hot glue gun.  

I contemplated using boxwood greens, like in my inspiration picture, but our boxwood just isn't in need of a trim right now.  I thought I might kill it if I cut a bunch of it off in December.  So I went with the pine branches, and it worked well!  Then, I used my technique for cutting even strips of burlap, and fashioned some bows to tie on top of the letters.  I like how they soften the straight edges of the wreath.  


When I picked up the wreath to hang it, the weight of the branches threatened to cause the cardboard to fold over on itself.  No fear!  I just sawed some extra paint sticks that we had laying around and hot glued the pieces to the back of the cardboard in order to fortify the template.  


Worked like a charm!  Then I glued some twine to the top and hung it using a removable hook.  It needed a little somethin' somethin' so I tucked some holly berries from an old wreath into the burlap bows before hanging it outside. 


Where it looks fabulous, but the flash from my camera makes the gold on the cardboard jump out at you!  It doesn't do that in real-life.  I can't see past the pine needles to the gold in person (much like the picture taken in the garage up above).  I wish you could see it that way!  But...it's pretty much always dark by the time I get home from work. So a flash is a must this time of year. Or I have to get up earlier and be more productive on the weekends..... 

Um, no. Sleeping in on the weekends tops all other priorities. 

Kidding. Kind of. 

Of course that wouldn't have happened had I just painted the letters green.  But I didn't have green paint.  And gold is fabulous and holiday-appropriate, right?  

Right. 


Hooray for not one, but two free holiday wreaths on the front porch.  And those branches...I dug those out of the woods behind our house.  

Hey...I have presents to buy.  


See ya tomorrow!  I have so many holiday posts, I don't know how I'll fit them all in before Christmas!  Cheers to that!

Linking Up At
Work It Wednesday
Get Your DIY On
 photo signature_zps64b784cd.jpg

Monday, December 2, 2013

Christmas Wreath (and confession)

Related Posts Plugin for WordPress, Blogger...
I have a confession to make, you guys.  It's one that will surprise and probably disappoint you....

I'm kind of a Grinch about decorating for Christmas. (Hangs head in blogger shame.) In fact, there have been years that I've made a case for not putting up a tree at all.  I mean, it's just me and Mr. M. around here, so it's not like I'd be depriving little kids of Christmas or anything!   But apparently I would be depriving Mr. M., because he has never allowed my Grinch-status to go to that extreme.

It's not that I don't like Christmas decorations!  I do.  I like them a lot, actually!  But it seems like so much work and money to spend on decor that will only be up for a few weeks!  

I mean, if I'm going to spend money on decor, I want to buy stuff that can be displayed for most of the year. I was browsing Christmas decor recently, seeking out some white lighted garland for our built-ins in the family room, and the absolute cheapest that I could find was on sale for $30 of 9 feet of garland.  I would need two.  $60 for some white stuff to put in front of my TV?!  Um, no.  I could buy some really cool stuff that could be fabulous in my home all year for $60.  I just can't get that into it.  

But you know that I always do a wreath!  


This was my first time making a wreath from fresh greens.  Although I don't know why, since we have at least four or five pine trees on our property.  It just never occurred to me until this weekend!

I started out by using a grapevine wreath as a wreath form, and tucked several pine tree clippings into the grapevine, using twine to secure any pieces that didn't want to conform to the round shape.  Then, I went back and added in smaller clippings to fill in the thin spots.


Once I had my wreath covered in greens, I wrapped a red ribbon around the wreath and tied on some of my favorite shatterproof ornaments. And of course I added in a monogram with a little holiday sparkle!  


But it still needed something, so I decided to add in some sparkly embellishments that I rescued from a clearance rack a few months ago.  I think they are designed to be used in jewelry-making, but I thought they would be perfect to bring a little glitz to a fun holiday wreath.

Don't mind my messy, makeshift wreath-making station.

And here's the final result!


Did you notice the fun wreath hanger?  Isn't it great?!  I want. every. color.  Find it here.


To be honest, I'm not in love with the red ribbon.  I wish that I had more of it, because it could have used a few more 'wraps'.  But I didn't want to leave the house to buy more, and wasn't really willing to tear the whole wreath apart to fix it.  Oh well!


And in the spirit of being a good blogger, this year I am trying to embrace the holiday decorating spirit in decorating the rest of the house.  I can't wait to show you what I come up with!

Linking Up At
Get Your DIY On
Give Me the Goods
The DIY'ers
Inspire Me Please Weekend Blog Hop
Work It Wednesday

 photo signature_zps64b784cd.jpg

Tuesday, September 3, 2013

Put a Wreath On It


A few days ago, I posted my burlap wreath tutorial.  So while I was at it, I decided to update my own burlap wreath by swapping out the embellishments I had on it.  And while I adore fall decoration, I'm just not quite ready to go there yet, especially considering the temperatures have been in the upper 80's lately.

Enter my huge bundle of peacock feathers.  My grandma gave these to me from her house several months back when I mentioned how much I liked them, and I've been plotting a use for them ever since.
Look at how many there are!!!  I see some more peacock projects in my future :)

Creating the wreath was actually really easy!  I spray painted one of my wooden letters dark purple, and just threaded the stems of the feather through the holes of the burlap.  I had to cut the feathers to a shorter length, and strip away some of the excess barbs to expose the quill, in order to thread them in.  Then I just tied the letter M to the wreath using a thread from the leftover burlap.  

You can see how the quill is threaded through the burlap in the upper left quadrant of the picture.


I'm pretty much in love with this thing.  What's fall decorating?!  I'm not taking this off my door anytime soon!
 photo signature_zps64b784cd.jpg