Showing posts with label family room. Show all posts

Monday, September 30, 2013

Cozy-ing Up the Place for Fall

I'm not huge on seasonal decorating, not because I don't love the idea of changing my decor to celebrate all four seasons (and every holiday in between), but mainly because I neither the room to store all of that stuff, nor the extra cash to buy four seasons worth of decor in the first place!  But I am trying to find ways to incorporate fall into our decor, and am hopeful that if I limit the purchasing of new items and 'shop my house', I can find thrifty and non-bulky ways to cozy up the place for fall.


So this weekend, I made some quick changes intended to bring warmth and more of a cozy feel to the family room.  First up, was a re-styling of the built-in bookcases on either side of the TV.  Styling shelves is something I struggle with.  I want to create layered, collected-looking shelves but I also abhor clutter, so trying to walk the line between the two usually results in shelves with which I'm never completely happy.

In case you haven't checked out our family room, here is a look at how they were styled before.  Not bad, but perhaps a little sparse.  Definitely not warm and cozy.


So I dug out some of my hardback books (I don't have many, I prefer paperback....and lately, Kindle), and brought some of the other decor from around the room and began to re-style the shelves.  Some of the books had covers that were a little bright for my purposes, so I covered those with brown paper bags, to tone down the color-factor. I emptied the shelves first and started again from scratch.  My focus was on creating layers of objects, in order to create more warmth, variety and texture.  I stacked books both horizontally and vertically, often using them as a platform to elevate shorter object.  I tried to put my frames in the back of the shelves, and layer shorter, more sculptural items in front. 

For once, I'm pleased with the result!  The shelves feel much more interesting and create a more 'collected' look.  The only drawback is that I pretty much had to empty all of my end tables of decor in order to  accessorize the shelves.  So now the end tables are bare, except for table lamps!  


Next up, I turned my attention to furniture.  I was super-excited to find a TON of brand-new Target decor at Goodwill last week, and picked up an amazing rust-colored, knit-sweater throw by Threshold.  I knew I wanted to use it in the family room, and after playing around with various placements for a while, settled on using it to add texture, color, and warmth to our love seat.  

Between the stone, the throw, and that rug, this area is not lacking for texture.....but I feel like there's always room for more!

And finally, I swapped out the paper shade on one of our table lamps for a Nate Berkus burlap shade that I also bought at Goodwill.  The selection of Target goods was AMAZING, I tell you! I've heard that this can happen at Goodwill, but I've never experienced it myself...until now. I picked this guy up for a cool $8.  Again, I think it's a nice, warmer texture, which feels more fall-like to me.  


Do you decorate for the seasons?  How do you change up your decor for the colder months?

Linking Up At
 photo signature_zps64b784cd.jpg

Sunday, July 14, 2013

The White (and gold) Stripes

Here it is, the post you have all been waiting for.  Ok maybe nobody has actually been waiting with bated breath for this post, but I have been very excited to show this project to you!! 


Remember how I mentioned that I thought the white grommet-topped curtains in our family room could stand to have a little more flavor?  Well, call me Emeril, because flavor them up I did!  BAM!

I spray painted my curtains. 

That's right, you heard me.  I spray painted my curtains, and I liked it.  Here's how you can do it too.

The curtains that flank our patio doors are actually four separate panels.  I took each panel off the rod, laid it out flat on the floor and measured it to help me decide how wide my stripes should be. The length of the curtain was just over 83 inches, and I knew that I wanted to have 7 stripes (4 white and 3 gold, so that the curtain would be more white than gold), so I decided to make each stripe 11.75 inches wide.  The bottom stripe would be slightly wider, but I knew that it would not be noticeable. 

So, I started at the top of the curtain and measured down 11.75 inches, making a tiny pencil mark along the left edge, center, and right edge of the curtain (all 11.75 inches from the top).  Then, I taped a strip of blue painter's tape along that line, making sure that I line up against all three marks to ensure that my stripe would be straight.  Once I had my first line taped off, I measured 11.75 inches down from that (again at both edges and the center) and placed another strip of tape, and so on. 

The thing that I had to remember was that whether the tape should be placed above or on below my pencil mark depended upon whether that stripe would be white or gold.  For the white stripes, I wanted the painters tape to be placed within the area to remain white.  For the gold stripes, I wanted the painter's tape to be placed outside of the area that would be painted gold.  Looking below, you can see what I mean.  The white stripes appear to be thinner than the gold stripes, but that is just because the portions covered by the blue tape will be white when removed.

White, gold, white, gold, white, gold, white


I cannot put enough emphasis on the importance of making sure that you seal the painters tape firmly.  A good seal ensures a clean paint line when you remove the tape and is essential to the success of this project.

Next, I used strips of a clear plastic drop cloth to cover the stripes that were to remain white.  This part was easy; I just cut the drop cloth in the widths that I needed and used painters tape to keep them in place.  Once again, a good seal on the painters tape is essential to ensuring that you don't end up with gold paint in areas that are supposed to remain white. 


Then it was outside for the spray painting portion of the project.  Believe it or not, I just used regular old Rustoleum metallic gold spray paint.  A lot of it.  In order to get good coverage of the white curtain, it took 2 coats of spray paint, which equaled about 2 cans of paint per curtain.  Since fabric has so many nooks and crannies within the weave, I would recommend doing the first coat from one side of the curtain and the second coat from the opposite side.  Using multiple angles ensures that you get complete coverage. 

 After one coat, there was still some white peeking through.
 But after two coats the coverage was very good.

About five minutes after the second coat had been applied, I removed the tape and the plastic strips.   I wasn't quite sure what to expect...but the lines came out AMAZING. Look at those perfect stripes!


Once I had the first panel done, basically all I had to do was repeat the process with the other three panels...with one small exception.  Although I had four identical white curtain panels that I bought all at the same time, they were....irregular.  Some of the panels were slightly longer than others, and if I measured the same distance from the top of each curtain, the stripes might not line up with each other. That would look terrible, and this concern almost derailed me.

  My husband pointed out that the constant was the grommet, since all of the grommets hung from the straight curtain rod, and told me that if I started the first gold stripe the same distance underneath the grommet on each curtain, they would be even.  I could then measure my 11.75 inches on all of the stripes below that.  Which is exactly what I did, and......


 ...they lined up beautifully! 


  I can't get over how much I love them!  I feel like that add depth and interest to the family room.  They look cool next to my patterned chair.  I think they are my best project to date!!


But now I wonder if I should somehow stripe the white grommet topper curtains in the other half of the room? But I worry that might be too much. What do you think? 


Linking Up At
House of Rose Inspire Me Please Weekend Blog Hop


Monday, July 8, 2013

Gilded Picture Frames

Last week I showed how our living room has evolved over the four years we have lived in our home.  The post made me realize that the shelves on either side of the TV could use some lighter, brighter items to pop off the red wall. An idea was born...


Here are the frames that I started with, as well as some shots of them on the shelves.  Nothing wrong with them, they just needed something to make them stand out a little more.


So, I grabbed my trusty spray paint, a roll of painter's tape, and set out on my mission.  First, I removed the pictures and taped off the back of the frames and the area where the picture sits, and then I painted each with two coats of off-white spray paint.

Once the off-white paint was dry (not tacky to the touch AT ALL), I used the painter's tape to cover the areas that I wanted to remain off-white.  For the smaller frame, I color blocked along the planes of the frame, and on the larger frame, I just taped off diagonal stripes.


Next, I sprayed two coats of metallic gold Rustoleum spray paint onto each frame.  The larger frame was coated beautifully, but the smaller frame looked like this in one corner.


Hmmm. Not sure what happened there.  Maybe I sprayed too much paint in one spot, breaking the all-important 'multiple thin coats are much better than one thick coat' rule of spray painting??  The paint wasn't really cracked, it just bunched up together in one spot, creating a crackled look.  It was kind of cool!  If only it hadn't happened in just one spot...

So, I went back outside and sprayed 'too much' in a few other spots on the frame.  The same thing happened!  Now it looked like the crackle finish was intentional, and gave the frame some interest.  Crisis averted.

I carefully pulled the painter's tape from the frames as soon as I finished spraying the gold paint, because I was afraid that it would remove the gold paint if I waited until it dried.  Finally, I sprayed both frames with a clear acrylic spray to protect the paint job and make them more chip-resistant.


Fabulous. Easy.  And free, since I already had all of the supplies I needed.  My favorite kind of project.  Stay tuned, because I have some BIG plans for the rest of that gold spray paint (and the other six cans occupying the shelf in our garage). 


What items in your home have you given new life?  Do tell!

Linking up at


Monday, July 1, 2013

Evolution of our Home: Family Room Edition

When we bought our house in 2009, the family room was one of the spaces that most intimidated me most.  And by intimidated, I mean I was afraid cried  on the day we closed on the house because I was overwhelmed by all of the cosmetic changes that needed to happen in order to make this house a home that I loved.  Did we have time, money, and skills to do all of this?  I was worried. In typical fashion, my husband was not.

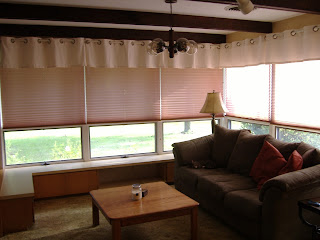
The family room scared me because it had an odd layout, with so many built-in cabinets I wasn't sure how our furniture could be arranged.  It had two different types of carpet, in fact it had two different types of ceiling! The built in cabinets were topped with glass-front display cases, bringing back memories of middle school science class. It even had one of those old accordion doors separating it from the room next door, that was to become our dining room. You know, the kind that were used in older schools to separate two adjoining classrooms or halves of the gym?  Basically, the whole house was bringing back memories of middle school.  No wonder I was so scared.

 Here are some 'before' pictures to help you understand my concerns. I wish I had taken more angles, so that I could show you the accordion door, because then you might truly understand!


That's not to say that this room didn't have any redeeming qualities. As you can see above, one whole wall is made of stone and has a window that connects the family room to our kitchen. It used to be an exterior wall, but when the couple that built the home enclosed their patio, it became a part of the family room.  Plus, look at all of those windows!  And there's this cool lighting fixture they installed.  It's so unique.  I love it!


My husband had the idea to knock out the divider between the middle two display cases, and to remove the shelves in order to create a space to house our TV.  He did such a great job, and the finished product looks like a built-in entertainment center.  The cabinets below house our DVR, DVD collection, and much more!

We also painted the walls red (yes, the same color red that we painted the front door and yes, I do use other colors in our home). The paint is by True Value and the color is called Sanguine.  I love how saturated the color is, without being too in your face.  Definite progress.


(Notice the little photo-bomber with the glowing eyes in the bottom picture.  That's Bron, one of our cats.)

But the real changes started happening when we ripped out the carpet in most of the house and replaced it with laminate wood flooring.  We used Pergo (I believe the color was Red Jatoba, but it has now been discontinued), and Mr. M. installed it himself over several weekends. I didn't have much to do with it other than try to play DJ and dance around the house while he worked in my own private 'the ugly carpet is gone' celebration.  Ah, I can hear 'This is How We Do It' playing in my mind now....


Add in some new chunky jute area rugs, trying my hand with pattern-mixing in my throw pillows, and the addition of a chair/ottoman, and that pretty much brings us up to where we are today. 


I still have a lot of ideas for this room. The mauve blinds that came with the house could stand to be replaced. I've always thought the built in shelves around the windows could be a cool upholstered bench, the off-white curtains could stand to have a little more flavor, and I'd love to find some fun lampshades to flank the couch.  But I've come a long way from crying about this room.  And as for the two different ceilings,  now that the room is filled with things that I love, I hardly notice them anymore! 

What room transformations have you done to your home?  I'd love to hear about them!

Linking up at