Showing posts with label gold. Show all posts

Wednesday, July 30, 2014

Summer Seashell Decor

Hey guys!  I shared this post over at Sweet Haute a few days ago, but here it is for any of you who missed it!

I love finding ways to incorporate the seasons into our home!  For me, the perfect seasonal decor is both affordable and easy to store.  Bonus points if it uses things that I already own, especially objects that can be transitioned from one season to another.  

Today's project  is a winner on all fronts.
Love when that happens!

 photo SummerSeashellDecor_zpsb7acfdc0.jpg

I started by giving the gilded treatment to some sand dollars that I had on hand (I picked  them up on summer clearance last fall, certain that I would one day have a use for them).
  I pretty much find a way to paint everything in our house gold. I'm a modern day King Midas.

 photo GildedSeashells2_zps2b20bdee.jpg

I decided to use the golden sand dollars to fill some of the picture frames that we have around the house.  I love swapping photos for seasonal inserts, because it is just so easy to put things back to 'normal' once the time for seasonal decor has passed, and it leaves me with very little to store.

To create these fun frames, I started by removing the photos and the glass from the frames.  Then, I simply cut a sheet of white paper to fit and used spray adhesive to attach a piece of burlap that was also cut to fit each frame.  I put the sheet of burlap into the frame, secured it by replacing the back, and attached a golden sand dollar to the center of the burlap using hot glue.

Incredibly simple, but oh so cute!

 photo SummerSeashellDecor2_zps67837418.jpg

I had a few leftover seashells, so I glued them to a piece of pre-stained scrap wood that I had on hand. I think it makes a nice compliment to the sand dollar frames! Also, once summer is over, it will pair nicely with the wooden pallet sign that I shared with you guys a few months ago, which will be a nice little reminder of summer once the air turns brisk and the leaves begin to fall...

Ah.....fall.  Love that season too!

 photo signature_zps64b784cd.jpg

Tuesday, July 15, 2014

Gilded Seashells


I totally forgot that I had these sand dollars hanging out in my decor closet!  I bought them on clearance last fall, and was tempted to use my fav liquid gold leaf (of course) on them immediately. But I held off so long that I forgot about them!

I love when I find a surprise in the decor closet. 
Is is shameful that I don't always remember what I put in there?  Is it even more shameful that I feel compelled to liquid gold leaf EVERYTHING?!


Creating these cute sand dollars couldn't have been easier.  I used painter's tape to create sharp, crisp lines on two of them, and free-handed the rest with a craft brush.

I do have an idea for making these babies into something even more special, but for now they are jazzing our coffee table.


Can't wait to show you what they turn into!


 photo signature_zps64b784cd.jpg

Monday, March 31, 2014

DIY Sharpie Mug

Monday already?!  

Mondays call for an even larger than normal dose of coffee, and this Monday morning I'm drinking my second favorite drink (wine wins!) out of a fab new coffee mug.


I've been seeing cool Sharpie mugs all over the place, and have been keeping my eye out for a cheap, white mug so that I could create one of my own.  

Not like white white mugs are hard to find, but I was being really cheap about it.  Even the $3 mugs at Walmart weren't making the cut.  

But last week, I stumbled across a few Starbucks Scales Mugs for the bargain price of $1.25, so I snatched those babies right up.  They are gorgeous as-is, so I certainly won't draw on all of them.  But the triangles seemed like they would make it easy for an artistic failure like myself to create a cool design.

Also, wouldn't they make a great vessel for a small gift for almost anyone?!  I can imagine a ton of cute gifts that could be given in this beautiful mug.....so I bought a few extra for that purpose.

You can find the Starbucks Scales Mug here....but not for $1.25. Sorry.
(Affiliate link)

To create my mug, I just traced and colored in triangles using two different Sharpies--one black and the other gold.  Tracing the triangles wasn't quite as easy as I expected it to be, so the shapes took on a slightly hand-drawn, imperfect look.  Which I kind of dig. 

To make the design permanent and dishwasher safe  (Update-- My mug lasted only a few cycles in the dishwasher before the Sharpie began to wear away.  So if you want to preserve your artwork, hand washing is the way to go.  Me, I  keep putting it in the dishwasher and chalk the wear and tear up to be proof of how much I love my mug!), I baked the mug in the oven for 30 minutes at 350 degrees.  When baking Sharpie designs on glass or ceramic, it is important to put the object in the oven while it is completely cool, and to allow the oven to cool off completely before removing it from the oven.  This prevents your mug or other object from cracking due to sudden temperature change.  

I found that my gold triangles became much more matte after being baked.  To be honest, I liked the mug better when the gold triangles were shiny...but it still looks good with the matte gold triangles, and there's not much that could be done to prevent that.   


So simple. So cute!
Have a great week!

Linking Up At

 photo signature_zps64b784cd.jpg

Thursday, February 6, 2014

Valentine's Day Gold Leaf Plates


As I've said before, I don't go too crazy with holiday decorating.  Especially for non-holidays like Valentine's Day.

 BUT I went a little gold-leaf crazy while I was snowed in this week.  And while I was at it, creating some Valentine's Day art seemed like a good idea.  

Plus, I had some mismatched salad plates laying around. So I had no choice, really.

I love the chippy, imperfect finish that gold leaf produces.  Which is a perfect match for the very imperfect method that I used to create these plates.  I simply used a small paint brush dipped in adhesive to paint a design on each plate, covered the whole thing with gold leaf, and then used an old toothbrush to brush off the excess. Once that was finished, I used the toothbrush to rub off a little more of the gold leaf in order to give the plates a worn look.


I used these unexpected additions to change up my console table decor....


....which might be one of the most difficult places in the house to photograph. Shadows abound.


I think they are kind of fun!

Linking Up At

 photo signature_zps64b784cd.jpg

Wednesday, January 15, 2014

Gold Rush

You guys have probably figured out by now that I really love gold. I mean, I've only blogged about stuff that I've gilded here, here, here and here.

Well...my gold obsession (and, I suspect, the gold trend) isn't going anywhere anytime soon. The latest victim of the 'gold war'?  A simple, white bowl that I picked up for a few bucks at Pottery Barn Outlet.


I used my favorite liquid gilding to free-hand a simple design on the inside of the bowl, and painted a solid triangle of gold on the outside edge.  


My unsteady hand and the paintbrush resulted in imperfect lines and finish, but I kind of like that!  It gives the bowl a hand-made vibe.


To be honest, I kind of love ALL metallic accents.  Gold, copper, chrome...I'm there.

What about you?  What's your fav metallic finish?

Linking Up At

 photo signature_zps64b784cd.jpg

Monday, December 23, 2013

The Yummy Dozen

Related Posts Plugin for WordPress, Blogger...
No matter what your holiday traditions are, it's pretty much guaranteed that Christmas morning is nuts. Exchanging gifts, putting together new contraptions, traveling to see loved ones....it's a busy morning.

But it's also a special morning, one where my typical breakfast of coffee and a Fiber One bar just doesn't seem quite celebratory enough.  And while its just Mr. M. and I at home on Christmas morning and, if I'm being honest, our Christmas morning breakfast usually consists of coffee and cookies (hey, it's a special day),  I've always thought that having something delicious to pop in the oven while we open gifts would be nice.

Maybe this year is the year that it will happen.  So just in case, I've put together a list of one dozen make-ahead Christmas morning breakfast ideas that sound divine!


And if I decide to just eat a bunch of cookies before noon instead of a formal breakfast.....well, that's OK too!

(All images via Pinterest)
Cranberry Almond French Toast Casserole by Kristen at Capturing Joy.

Christmas Breakfast Skillet Casserole shared over at Crunchy Creamy Sweet.

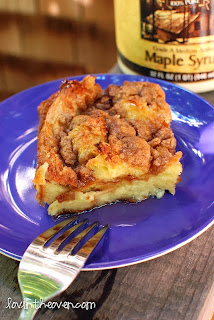
Cinnamon Baked French Toast by Lovin' From the Oven.

Make-Ahead Breakfast Braid shared at Cooking Club.

Make-Ahead Breakfast Strata from Steeltown Delicious.

Overnight Caramel Apple Rolls shared at Tablespoon

Christmas Morning Monkey Bread shared at Tablespoon.

Overnight Eggnog French Toast Casserole from Five Heart Home.

Pull-Apart Sticky Buns from The Yummy Life.

Overnight Egg-Sausage Bake from Betty Crocker.

Ham and Cheese Breakfast Bake from Making Life Delicious.

Gingerbread Coffee Cake with Cranberry Pecan Streusel from Willow Bird Baking.


YUM.  I don't even know how to decide which one to (maybe) try!  

Which recipe sounds good to you?

Linking Up At
Sweet Haute

 photo signature_zps64b784cd.jpg

Tuesday, October 29, 2013

Haute Antlers

Last weekend, I went "shopping" in my parent's basement. Say what?  Most of you don't know my parents, but those of you that do know that the basement is my dad's (and the dog's) domain.  It's filled with wildlife prints, a bar and beer fridge, and yes, antlers.  

Which is exactly what I was there for.  Antlers are hot right now, and lucky for me, my dad has a ton of them that he was willing to donate to the cause.

My selection.  And this is just what he had in the house!  He said that he could bring more from his hunting camp.  Um...yes, please!

Why did I want antlers, you ask?  Duh, so I could spray paint them!  Have you not caught on yet?!  Antlers are cool.  They're sculptural, you can paint them any color you like, or just leave them natural.  I can think of a million places that I could use them. And mine turned out pretty fab, if I do say so myself!


This project was about as easy as it gets.  I spray painted the whole thing off-white and allowed that to dry.  Then I went back and taped off the tips, covered the rest in a grocery store bag and spray painted gold.  I painted the skull part (Ew, that sounds so gross! It really wasn't.  I mean these antlers were dated 1984, which is almost as old as I am.  It's not like there was anything gross left) by hand with Martha Stewart's liquid gold leaf craft paint, since it was too difficult to tape off. 

Side note: This was the first time I used the Martha paint.  It was amazing.  I'm actively resisting the urge to paint everything in sight. 

It makes a nice little addition to our family room bookshelves, don't you think?


And a wide shot, so you can see the entertainment center area.  I like how they stand out on the red walls. 


Never one to quit while I'm ahead, I decided that my first set of antlers worked out so well that I would paint one more for the living room.  This room has a much cooler color palette, of dark purple and gray, with turquoise accents.  

So this time, I decided to paint my antler turquoise, and use silver spray paint in the tips.  I added a stripe of black craft paint to define the line between turquoise and silver.  

Another home run in my book!  However I had some trouble deciding where the antler should live for the time being.  

I tried it on a little accent table.....It looked great!


And then in one of the speaker stands that flank our TV stand....also looked good in there!  I imagine layering some other objects behind it, if that were to be its final resting place.  


And finally, I tried it as part of my coffee table vignette....also fabulous!


It looks great everywhere!  What's a girl to do...

I'll probably make another one :)

Linking Up At

 photo signature_zps64b784cd.jpg

Saturday, September 21, 2013

From Goodwill to Gilded

Good morning!  I'm bringing you a rare Saturday post, because I just can't wait until Monday to show you this project that I'm so excited about!  Also, there are just four days left to enter the Better Homes and Gardens subscription giveaway!  Enter through this post. Ok, now on with the project!


It all started with a trip my local Goodwill, where I picked up this cool tray for $5. The unique shape caught my eye immediately, and I knew it would be my next project.  You see, I've been seeking out interesting trays for many of the tables in our house for some time, and have been disappointed in both the selection and the prices I have found.  So for five bucks, bringing this baby home was a no-brainer.


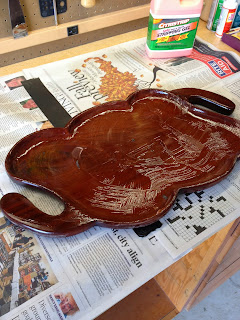
I knew that I wanted to use the tray on our family room coffee table, and I also knew that I wanted part of the the tray to become gold. I've been dying to try gold leafing for EVER, and so I decided that this would be the perfect project to start with.  Because I had never worked with gold leaf before, I wanted to make sure that I prepped the tray properly, in order to increase my chances of success.  This was a project with multiple firsts, so with my husband's guidance, I used wood stripper to remove the finish from the tray.  From this day forward, when someone types 'stripper' in my blog search box, I will now have a result to offer :)

 We used Citristrip, which lived up to its word of being both safe and effective.  I painted a thin layer of stripper on the tray waited about 45 minutes, and then used a plastic scraper to scrape off the finish and some of the stain.  It worked like a charm, and was really easy.    The result:


A tray perfectly prepped for painting.  I painted the entire tray with three layers of glossy black latex paint.  I opted not to prime the tray, which allowed some of the wood-grain texture to peek through the paint.  Check out my high-tech paint stands, aka paper bowls.

Once it was painted, I patiently waited 24 hours before starting my gold leaf experiment.  I bought Mona Lisa's Gold Leaf kit for $11.99, which comes with 25 sheets of gold leaf, as well as a bottle of the necessary adhesive and sealer.

I started by applying a thin layer of adhesive to the areas that I wanted to gold leaf....

...and once it had dried to the point of being tacky, I began to apply my leaf.  To apply, I simply put a sheet of gold leaf on the tray, and used a dry foam brush to smooth it out. Smoothing out the gold leaf perfectly was not possible, but I think that is to be expected.  I think part of the beauty of gold leaf lies in the texture and imperfections. I repeated until the entire tray was covered.
Once the tray was covered I used my dry foam brush to brush away the excess gold leaf.  I used some of the excess flakes to patch any areas that were not covered, as there were a few seams where the black showed through.  From there, I still had a few seams, and I spot-applied a second coat of adhesive to cover those.  I'm not sure that was the best idea, as it left a few areas that were not as smooth as they had been initially.  But, like I said, I think texture and imperfection are part of gold leafing.  Then, I applied sealer to the entire gold-leafed area to protect the leaf from oxidizing, and it was done!

I'm pretty much in love with it. Here's a before and after pic.


And look how amazing it looks in our family room!


I'm still considering applying a coat of shellac to the whole thing to give it a perfectly smooth, glossy finish.  I just need to do some research to make sure that doing so wouldn't damage or react with the gold leaf.  In the meantime, it is looking gorgeous and holding up just fine.

The total cost breakdown for the project is:
Tray- $5
Gold Leaf Kit- $11.99

For a total of $16.99.  Although I only used about half of the gold leafing kit, so if you want to split hairs, I guess you could say it cost about $11.  Either way, it's definitely a thrifty up-cycle!

Have you up-cycled anything lately?  Do tell!


TDC Before and After
 photo signature_zps64b784cd.jpg