Showing posts with label paint. Show all posts

Monday, April 14, 2014

When in Doubt....Make it a Planter


Happy Monday!  I had the best weekend.  The spring weather just makes everything better :)

A few weeks ago, I stumbled upon this interesting object at my favorite shopping destination (Goodwill for those of you who are new around here!).....no clue what it was, but I bought it anyway.


It had some cool carving along the sides.....


...and some really pretty blonde wood on the bottom.  It's too bad this lighter wood wasn't on the top...I may not have painted it if that were the case.


Whatever this thing was...I thought it would be a cool planter, and a great opportunity to try out my new Country Chic Paint sample! 


I thought it was pretty cool that County Chic Paint let me try out their paint and wax for free.  I chose Elegance, which is reminiscent of a robin's egg blue, and gold wax in keeping with my Midas tendencies.

You know me and gold....we're besties.  
Can't stop. Won't stop.

Before I could paint though, I had to widen the long hole on the top of the object  in order to be able to fit plants in it.  I mostly leave the power tools to Mr. M. (although I'm slowly learning), but even I can operate the Dremmel MultiPro.


I love that thing.  I used the sanding wheel to widen the opening to fit the roots of  the plants into the container, and then it was on to the paint!  

The best thing about Country Chic Paint is that it requires virtually no prep work. So I was able to skip the sanding and get right to the transformation.  Giving the planter two coats of paint was a snap, because the paint dries really quickly.  And once the paint was fully dry, I added a coat of gold wax, which brought a golden, shimmery finish to my planter. 

Then, I used my old trusty, Martha Steward Liquid Gilding and a small paintbrush to enhance the carvings, which turned out to be my favorite part of the whole project.


I added potting soil, some succulents, and a mini cactus that I bought at the drugstore (who knew??), as well as a few white rocks from the outside of our house to mask the soil and keep it in the container.  Since succulents and cacti require little water, I'm not too worried about water damaging the planter.  I just add a few ice chips to the top every weekend, which is when I water all of my plants, and it seems to be fine.


Right now, this little planter is bringing some life to our coffee table in the family room.  But the blue/gold combo will also look great in our living room, master bedroom, or hall bathroom.  

I see this thing moving around the house as inspiration strikes, and it's versatility has me quite pleased.


Anyone know what it was in the first place, anyway?!

Linking Up At

 photo signature_zps64b784cd.jpg

Thursday, September 26, 2013

Painting Stripes Tutorial

Before we get started, congrats to Megan M., who is the winner of the Better Homes & Gardens subscription!  Enjoy!!

A few weeks ago, I painted one wall in our spare bedroom with big, bold stripes.  I love the visual interest that stripes provide, and since the wall I chose faces the hallway, it creates a nice focal point when looking into the spare bedroom from the hall area.  I opted to paint the room light gray, with stripes in a darker shade of gray.  I truly thought that painting stripes would be difficult, but it was actually one of the easier projects I have done!  I had envisioned having difficulty getting the lines straight and evenly spaced, but my method worked beautifully!


I started by painting the entire room the base color (pale gray, in my case).  Then, I measured the height of the wall (96 inches).  I knew that I wanted to have seven large stripes, starting and ending with my base color.  That equaled out to 13.7 inches per stripe, which required too much precise measuring for me. So I rounded it down to 13.5 inches per stripe, knowing that if the bottom stripe was slightly wider that it wouldn't be noticeable (or even visible, since the bottom of the wall is mostly blocked by furniture).

I had heard that the best way to paint stripes on a wall was to use long level (several feet long) to keep the lines straight.  But when I checked at the store, long levels cost about $50.  Uh, no. I devised a way to make our medium-sized level (which is about 24 inches long) work just fine.  I didn't want to have to measure 13.5 inches again and again, so I measured 13.5 inches from the top of the level and marked the spot with a strip of painter's tape.

Starting at the top of the wall, I measured 13.5 inches down from the ceiling using my tape line to measure the distance and the leveling bubble to ensure that I was holding the level straight up and down.  I made a tiny pencil mark to mark my place (13.5 inches from the top) at the far left corner of my focal wall. Then, I moved over about three feet (as far as my outstretched arms would let me reach), measured 13.5 inches down from the ceiling again, and made another tiny pencil mark. The part about not making your pencil marks further apart from each other than you can reach with both hands will come in handy in subsequent steps.  I continued, working in 3 foot increments, until I reached the far right end of the wall.  Then, I measured 13.5 inches down from my first row of pencil marks and made a second row, also about 3 feet apart. Basically, you are creating dotted lines that you will use to apply your painter's tape. I continued until I had dotted lines for each of the 6 tape lines I needed.

It looked something like this.

Next, I stretched my painter's tape along the lines, making sure that I aligned the edges exactly where I had made my pencil marks. Since my dots were just an arms width apart, I found it easy to start on the left side of the wall, and stretch the tape straight between dots.  Since the tape is already straight, the result was a perfectly straight tape line that was far easier to achieve than I had imagined!  I had to keep in mind that for the dark gray stripes, I needed to tape outside the area to be painted dark gray.  For the stripes that were to remain light gray, I had to tape within the area that would remain light gray. This process was the same I used when spray painting stripes on my family room curtains.

I also applied tape to the corner portion of the wall adjacent to the focal wall, thereby keeping paint off of those walls as well. 

*Tip for Perfectly Crisp Paint Lines*
After applying tape, paint one layer of your base coat along the tape line. Once dry, follow up with as many layers of your accent color as necessary.  Any paint that bleeds underneath the tape line will be the same color as your base color, and will thus be invisible.  Perfect paint lines!!

I used a foam brush to paint the edges, in order to avoid brush marks, and  then rolled as close to the tape lines as possible. I applied two coats of dark gray paint to each stripe, and removed the tape immediately after painting in order to avoid the tape pulling any of my paint away from the wall.

Sorry for the terrible I-phone pictures.  I'm hesitant to get my fancy camera out when I'm painting or doing a messy project.


I'm so pleased with the results!  Keep in mind that we've done NOTHING but paint in this room.  I didn't even bother to wait for better lighting.  Or stage the room for pictures.  What would I have staged it with?! This room is such a hodge-podge.  But the paint job sure is fab!


What do you think of bold walls?  Would you try stripes?

Linking Up At

 photo signature_zps64b784cd.jpg

Thursday, September 5, 2013

6 Simple Rules.....

First things first, we FINALLY have a winner in the Olive Leaf Stencils Giveaway! Congratulations to Ashley A!! We're all super jealous, well at least I am! :)  


I've painted so many rooms, I'm pretty sure I could do it in my sleep.  Mr. M. and I have a tried and true method, honed over many, many hours spent with paint rollers in our hands.  Here are some of my tips for painting your walls like a (DIY) pro...

1. Prepping the room is key.
Prior to painting, you MUST prep your walls properly if you want to attain a smooth, blemish-free finish.  This includes patching up any holes in the walls.  We use DAP DryDex Spackle, which is nice because it goes on pink and is dry once it turns white.


For small holes,you just need to smear spackle in the hole, making sure that you fill it completely. Larger holes require a wire mesh patch, which you stick to the wall on top of the hole and then use spackle to cover it up. It's best to use a few thin coats, rather than covering it with one huge blob.


Self-adhesive wire mesh patch

Once all holes have been patched and the spackle has dried white, it is time to sand. And sand.  And sand.  Sand the spackled areas until they feel completely smooth with the rest of the wall when you run your hand over theml.  Then, give all of the walls a good once over with the sandpaper block, to smooth out any rough areas.

After you have sanded, there will be a TON of sanding dust everywhere. Using tack cloth (very sticky, cheesecloth-like material), remove all dust from the walls and molding by running the tack cloth over the areas until all dust is removed.  Once you think you have it all, go over it with tack cloth once more, just to make sure!

2. Painter's tape is worth its weight in gold.
Now that your walls are ready to be painted, you should use painter's tape to tape off all surfaces adjoining the areas to be painted.  This includes all doorways, baseboards, windows, and the ceiling (or crown molding) where it meets your walls.  Taping carefully ensures that you have a crisp paint line and that you don't spend hours painting a room that ends up looking awful.  

 Applying painter's tape takes forever and just generally sucks.  Do it anyway.

3. Be smart about opening your paint can.
Mr. M. taught me this trick to opening/pouring/closing paint cans with little mess: when you first open your paint can, use a nail to drive a few small holes in the lip the surrounds the opening of the can.  This way, when the paint gets caught in the lip, it has somewhere to drain.  This keeps the lip of the can from overflowing and creating a mess when you put the lid back on.  It's a quick tip that takes just a moment and and saves a lot of headache later.  Also, write the room you paint on the lid of the paint can with a Sharpie.  That way there won't be any confusion when you need to touch up your paint years down the line.  


4. Cut in THEN roll paint.
Cutting in (edging the corners, windows, top and bottom of the wall) with a paint brush first allows you to roll paint on top of your edging, which eliminates almost all of your brush lines.  Most rollers can get ALMOST into the corner to leave you with walls that have the smooth, even finish of the paint roller, rather than brush strokes from the paint brush.  

I like to pour my paint into a small container (plastic cup or other disposable container) when doing my cutting in, so that my arm doesn't get tired from holding a heavy paint tray.  Brush the paint onto the edges carefully, getting as little as possible onto your painter's tape.  While some paint on the tape is OK, the less overage you have, the less likely it is that the paint will bleed under the tape.  Also, brush away from the tape whenever possible, to reduce bleeding.

5. Use two coats, even if you don't feel like it.
I know, the paint looks pretty good after one coat.  It's tempting to stop there, but the truth is that it really takes two coats to adequately cover the wall and avoid any areas of 'peek through'.  Each and every time I paint, I secretly hope I can do one coat and call it a day.  It never happens.  And I'm always glad I did the second coat.  The color just looks richer and more professional.  Trust me, you need two coats or else a few days down the road you'll start to focus in on areas where the color looks a little thin, where tiny specks of the old color show through.  Sorry to break it to ya, that's just the way it is.  

The good news is, the taping is already done for the second coat!  You just need to cut in and roll again.  After all that taping nonsense the first time around, the second coat goes by in a flash!

6. Remove your painter's tape promptly.
I like to remove my painter's tape as soon as I finish the second coat.  Well to be more accurate, I like to wash all my brushes and clean up my materials (which takes 15-20 minutes) and THEN pull my painters tape.  If I wait until the paint fully dries, some of the paint starts to come off along with the tape, leaving me areas that need touched up.  And I'm not good at fine touch ups, so I try to avoid them.  Or make my husband do them.

Try to create a right angle as you pull the tape, I find that I get my best results that way.  Also be careful not to let the tape touch anything, as the paint on the tape is likely still wet.  


That's it!  Enjoy your walls, if you followed my rules, they should look pretty damn good.

Linking up At
 photo signature_zps64b784cd.jpg


Monday, August 26, 2013

Evolution of Our Home: Hall Bathroom Edition

Oh the bathrooms in our house.  So much to.....wish I could change.  Seriously guys, I try to find things to love, build upon, and design a room around when it comes to updating our house.  Take the family room, for instance.  The stain on those built-ins is not even close to what I would choose.  But they're really well-built, in great shape, and have a ton of storage that works for us.  So instead of replacing or even painting them, we worked on choosing materials that would compliment them.  Make them the best they can be.  And for most rooms, this results in a room that I love without major renovation. 

But I just can't find much to love about the bathrooms.  They're small, they have carpet, and the tiled walls and colored fixtures make it difficult to easily change the look of the rooms.  Here's some before shots of the hall bathroom. (Warning: they're terrible pictures, taken way before the blog.)


Pretty sweet wallpaper, right??
But, as per usual, I sought to identify what I LIKED about the room and build upon that.  Well.....I like the pendant lights that are hung at two different heights (the pictures don't really show that, but one is higher than the other).  I like that I can turn on a heating vent with a switch on the wall (wonderful for cold mornings!).  And I like the large, distressed-looking mirror.  And I like.......well, that's about it.
Well, the mirror felt sort of coastal to me, and so many of the colors in our house are very dark and pigmented, so I decided I wanted a light room that just felt...fresh.  I decided to paint the walls a pale blue, add in plenty of white, and just create a room that felt clean and spa-like.

So I chose what I thought was a very light blue.  It seemed light to me (remember, I tend to gravitate toward darker, more dramatic colors), but when I got it on the walls, I ended up with......this.


I knew from the first brush stroke that it was bad.  But I convinced myself to keep going and thought that maybe if I just painted the whole room, that it would suddenly not be so bright. Wrong.  So wrong. I felt like I was Under the Sea.

So the next day (literally the next day, I couldn't stand it any longer), I brought the paint cards home again and chose a blue that was almost next to white.  And painted the bathroom for the second time in two days.  Yup, if you're keeping count, that is the second time that I have had to paint a room twice because the first color I chose sucked. Awesome.  But the second color was much better....


We changed out the window shade for one made of a natural material, and swapped the old drawer pulls and handles with brushed nickel hardware.  Though I wanted the bathroom to have a fresh, coastal feel, I did NOT want it to be theme-y.  I chose my accessories very carefully, selecting a lot of natural materials and avoiding anything beachy.  The only exception that I made was the artwork, where I just framed scraps of fabric that I found in the clearance bin at Joann's Fabric.  It is gray and white with touches of yellow, and had various sea creatures on it.  It was just too fun to pass up, and since it was yellow and only small parts of the pattern peek through the windows of the pictures frames, I thought it wasn't too beachy. Does that make sense?  It did to me!


This tray holds hand towels and a bowl where I stash my jewelry while I wash my face, shower, paint stuff, etc.  It's one of my favorite moments in the room, because it is functional and pretty.  And I never have to worry about where my wedding rings are.  If I'm not wearing them, I know they are in the bowl!


The shower curtain is mostly white, with tan threads running through it.  There are tiny sequins scattered through the threads, giving it just a little sparkle.  It's from Homegoods, and the pictures don't do it justice.  It's gorgeous!  I kind of want to hunt down a spare, just in case something happens to this one!


As usual, I have a wish-list for this room.  In a dream world, I'd love to tear it all out and replace everything.  But that's not realistic right now, so here's the list of things that I want to do that actually might happen in the near future:

To Do List
-Replace carpeting with tile (ASAP).
-Repaint trim
- Paint vanity (black???)
- Swap out toilet and sink for non-blue options
-Swap the hinges on the door and drawers for brushed nickel options
-Swap out light switches for ones that aren't yellowed (finding one to incorporate that heating switch has been problematic).

Oh yeah, and then there was that time that a candle that I left burning in the bathroom burned dark black soot for about an hour before I noticed and left me this on the ceiling.  Which wouldn't wipe off.  So I had to paint the ceiling too.  One more tally in the re-painting column!


But it was worth it to get the bathroom back to good. 


So that's where we are at!!  What rooms in your home do you find to be challenging?

Linking Up At

Saturday, August 10, 2013

Jewelry Box Makeover


I have a LOT of jewelry.  I don't feel like any outfit is complete without jewelry, and I like to switch mine up a lot, so I have quite a bit.  Storing, organizing and managing all of my jewelry has long been a struggle, so several years ago I bought a large jewelry box that had a TON of storage.  There were not many finish options when I bought the box, but at the time I didn't care.  I desperately needed storage, and was willing to sacrifice form for function.  Well no more honey oak finish, I tell you.  NO MORE!

 
Seriously, look at all of that storage!  I accidentally broke the mirror a few years back, when I let the lid slam.  I don't use the mirror, so I haven't bothered to replace it.   
 
 
Now before you go getting too impressed with my mad make-over skills, let me tell you that this was an exterior makeover only.  With the attached felt and all of those drawers, sanding and painting the inside would have been a major undertaking.  Ain't nobody got time for that.  Plus, to be honest, I don't really care what it looks like when I open it.  As long as it looks good while sitting on my bedside table, I'm happy. 
 
The decided that this was the perfect project to take my first stab at painting, distressing, and glazing a piece of furniture.  I've read several tutorials, and it seemed like a job that I could handle. 
 
I got started by taking the jewelry box apart, so that I could sand and paint the outside of each of the eight pieces.  Taking the box apart wasn't too difficult, but I did run into a snag where I couldn't remove any of the drawers without removing the very top piece on the back of the box.  The trouble was....that top piece appeared to be glued on.  There was no way that I could pry that piece off without breaking it.  So....


I sawed the part that was blocking removal of the drawers off.  Don't worry, it's under the lid when the box is closed, and I figured I could wood glue it back on later.  It seemed like the only way to take the box apart.
 
I gave each piece a good sanding, used tack cloth to remove the dust, and then taped off the parts of each piece that I did not want to paint. Taping took quite some time, because I had to cover ever surface on the inside of the box securely, so that the inside of the jewelry box would remain unpainted and clean.


Once I had each part taped up, it was over the drop cloths for three light coats of off-white spray paint. I really considered painting the box a fun color.  But I'm working on some colored lamps for our bedroom and thought it might be best to keep the jewelry box neutral.

 From there, I called it a day and let the spray paint dry overnight.


The next day, I took each of my freshly painted parts and distressed the paint with sand paper and a hammer.  I used the sandpaper to rub off  some of the paint on all of the edges, and on some of the drawer fronts.  I really had to sand hard in order to adequately distress the drawers!  Then I took a hammer and banged on the jewelry box lid to nick it up.  It was a little nerve-wracking to take a hammer to something that I had just worked so hard to repaint!  In fact I almost chickened out, but I persisted with the hammer and followed up with more sanding on top of the lid.  The goal was to remove paint from areas of the jewelry box to make it appear worn, so that glaze could collect in those areas when I glazed the box.  


Once each piece felt sufficiently distressed, it was time to try my hand at glazing.   I used True Value Simply Glaze, which is clear and can be tinted with any paint color. 


I tinted mine with some leftover chocolate colored paint, which we had originally used to paint our bedroom walls.  I did not measure my glaze or paint, but I would guess it was a glaze to paint ratio or about 2:1.  I wanted my glaze to be fairly opaque, but you could add more or less paint depending upon the level of opaqueness that you desire.  For convenience purposes, I just mixed my glaze in a plastic cup, and I used a foam brush in order to avoid brush strokes. 


I brushed on a coat of glaze to completely cover the painted surface....


...and then used a rag to wipe off almost all of the glaze.  The glaze naturally collects and remains in the areas that were nicked/sanded/distressed.  If you'd like a darker glaze, you could repeat this process until you reach the shade you desire.  I only glazed and wiped once. 

The results were AWESOME!  I was almost giddy to see that each piece looked like the distressed furniture that I covet in stores.


I was so excited about how well it was turning out, that I wanted to put the jewelry box back together immediately.  So I distracted myself by rubbing some Silver Leaf Rub 'N Buff onto the gold handles in order to transform them into silver fixtures.  Using Rub 'N Buff is so simple, you literally just rub it on, let it dry for a few minutes, and buff it to a shine.  The silver compliments the distressed white finish so much better.

Once everything was nice and dry, I put the jewelry box back together and just stared at its beauty for a few minutes.  I couldn't believe that I had lived with that horrible honey oak for so long.


I was so excited to get it into the bedroom and load it back up with my jewelry. 


And load it up I did! Let's do a tour, shall we?

 The bottom section holds watches, bracelets, and items that wouldn't fit in any of the top three sections.


Just above that are shelves that house more of my bracelets.

And then a set of drawers that hold my rings and The Land of Lonely Earrings.  I can't tell you how often I eventually find the lost earring and am SO GLAD that I held on to the survivor.  It's nice to have a place to keep them while I'm waiting for their mates to reappear.


But the BEST part of this jewelry box is the earring storage.  Eight removable stands hold dozens of pairs of earrings, and make it really easy to find and access what I'm looking for. 


And of course, there are several necklace hooks in the back. 
 

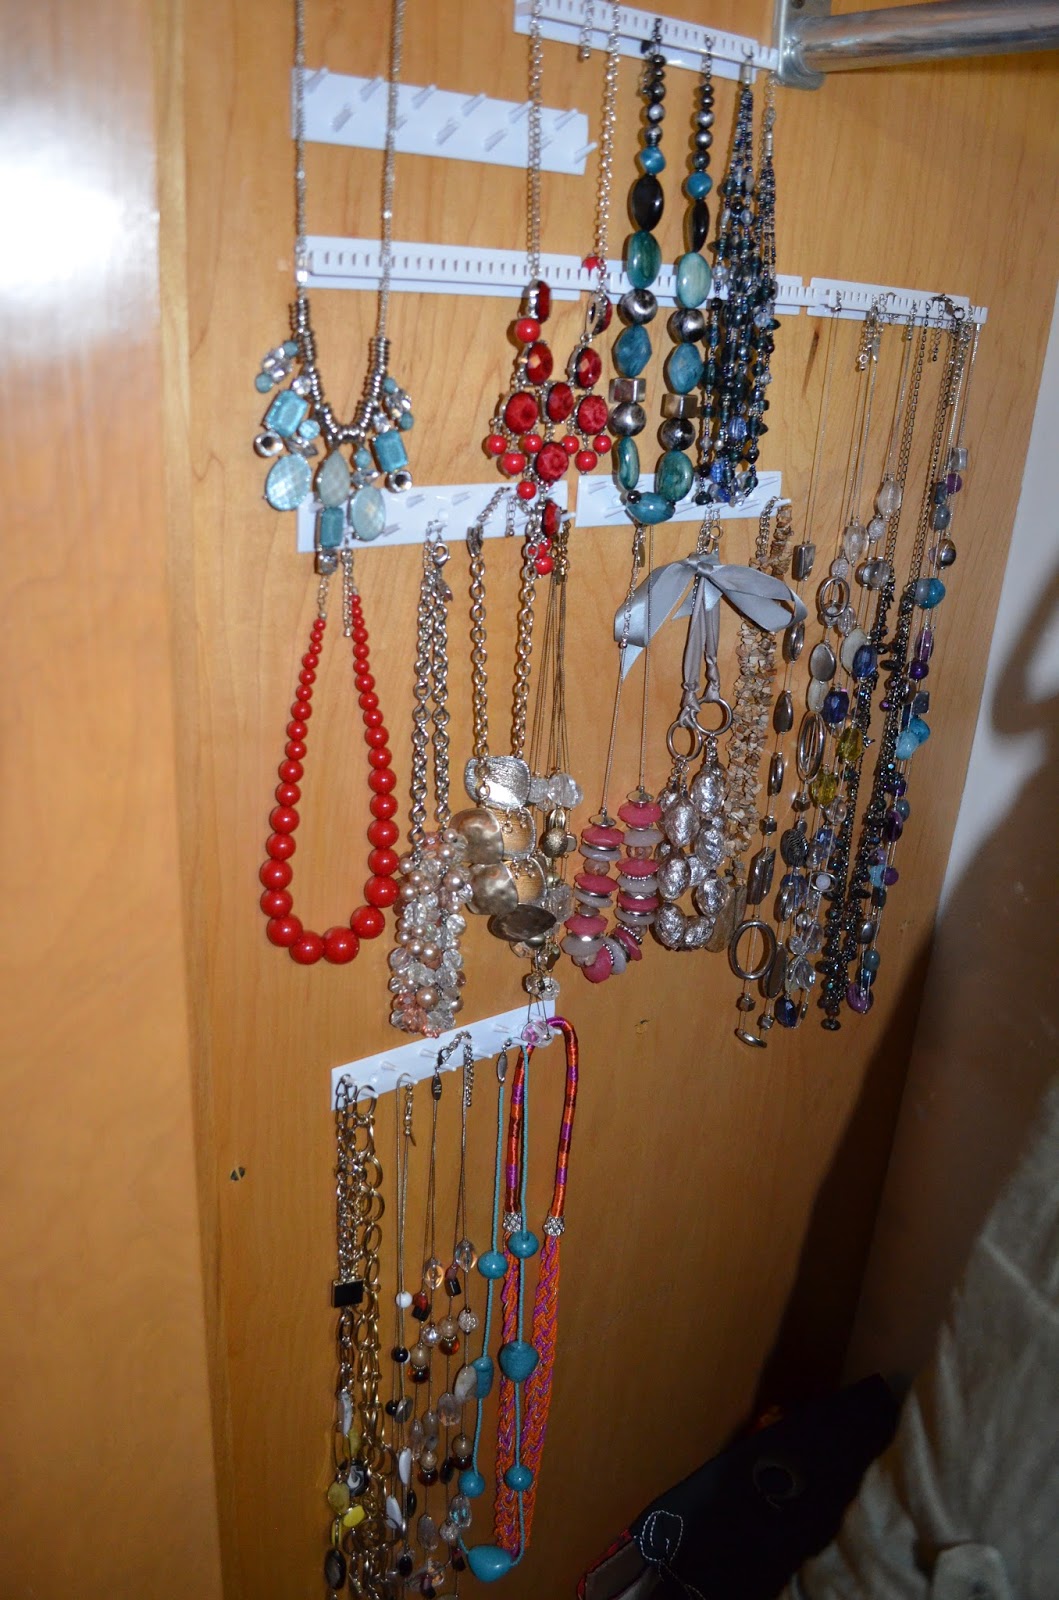
Not ENOUGH necklace hooks, mind you.  But I manage to find other places to hold the overflow...


 ...like the inside wall of my closet.  And a bowl in our bathroom.  And in a smaller jewelry box that I keep stored away.  And......I need to stop buying necklaces!

One final, happy shot of my newly updated beside table.  I like it so much better. Oh!  And if you like this jewelry box, you can find it here.  This is an updated version, but its almost the same as mine.  You can even get a honey oak finish of your own :)


Now if I can just force myself to put my jewelry away each day instead of putting in that bowl on the bathroom counter...
 
Have you glazed anything?  I'm hooked!  I want to glaze everything I can find now!


Linking Up To


TDC Before and After