Monday, April 28, 2014

Wood Burned Spoons

I had a deliciously unexpected day home from work last week, and since the weather was cold and rainy, it was a perfect day to chill inside. I adore days that I can just do whatever I want around the house, and this was a pretty good one! I used leftover Easter ham to make some homemade ham and bean soup and broke out my wood burning tool to work on a project that I've had on my mind for months....


I actually tried these out right after I got my wood burner for Christmas, but I hadn't quite gotten the hang of the tool yet, and that batch didn't turn out to be as pretty as I had hoped.  Still, I'll admit that even my less-than-perfect spoons jazz up our utensil drawer nicely and I tend to reach for them far more often than the plain spoons beside them.  

I guess they make me feel fancy :)

But this batch turned out to be much better than my first.  Here are some of my favorites....


Wouldn't these make a fun little gift?  Especially tucked into a fun dishtowel and tied them up with a bright  ribbon.


I'm thinking they'd be a great housewarming or hostess gift....


...now who wants to throw a party so I can bring you some?!

Linking Up At
 photo signature_zps64b784cd.jpg

Friday, April 25, 2014

Friday Favs 40

Hey hey hey!  It's my favorite day once again!


I'm incredibly lucky to have both an amazing mother AND a wonderful mother-in-law, so the approach of Mother's Day has been on my mind lately, and I thought I'd use this week's Friday Favs to share some of my favorite Mother's Day gift ideas...

Fav #1
I haven't shared my love of Sequin bangles in quite some time,  but I continue to adore them!  These colorful, affordable bangles would make a great gift for any accessory-loving mom.  Plus, a ton of styles are now 30% off!  Find them here.


Fav #2
I'm kind of in love with all of the amazing wall art prints available from Minted, and think that a gift certificate would allow almost any Mom to find a piece of art that she loves.  Hurry if you agree, they are offering 10% off Mother's Day gifts through 5/5 with the coupon code MOMDAY14.


Fav #3
What mom wouldn't love a necklace with their kid's name, in their kid's handwriting?!  I think these Acrylic Signature Nameplate necklaces from BaubleBar are so cute!  They come in a ton of colors, including silver and gold, and orders placed by April 30th should arrive in time for Mother's Day.  And if a name isn't your thing, you could have a necklace created with some other meaningful word written in a loved one's handwriting.  So cute!


Have a fab weekend!

 photo signature_zps64b784cd.jpg

Thursday, April 24, 2014

Wood Shim Art

Thanks so much for all of your kind comments and words of encouragement on yesterday's post.  It meant the world to me.

So I've been talking about transitioning our family room to a more spring-like color palette for weeks now, and while I'm not ready to call it done yet, I am ready to share another piece of Project Family Room with you!


You may remember that almost all of the walls in our family room are either windows or stone, which leave very little wall space for artwork.  The one piece of art that we do have just doesn't fit with the cooler accents that I'm trying to bring in for Spring and Summer, so I decided to DIY something new to fit the frame.  I didn't want to ruin the print, since I might want to use it again, so I just removed the cardboard backing that was keeping the artwork in the frame and stored the print in our attic for now.

Confession:  I'm not really feeling the red in here anymore.  I'm not sure what color I wish the walls were, but I have a feeling that the red may fall victim to a repainting mission that I'm pretty sure I'll feel compelled to complete during my upcoming 2 months of summer vaca.  Or maybe its just finally time to replace the window shades (which came with the house and we never got around to replacing because those things cause a fortune).  If I do paint, Mr. M. is going to want to kill me....he's not amused by my decorating ADD.

The closest thing I have to a 'before' pic.

So, back to the art project. I've seen some cool art being created using wood shims lately, and decided to create my own.  Most of the wood shim art that I have seen has used a herringbone pattern, but since I had just done that in my DIY Herringbone Art for the bathroom, I decided to lay my wood shims a little differently.  

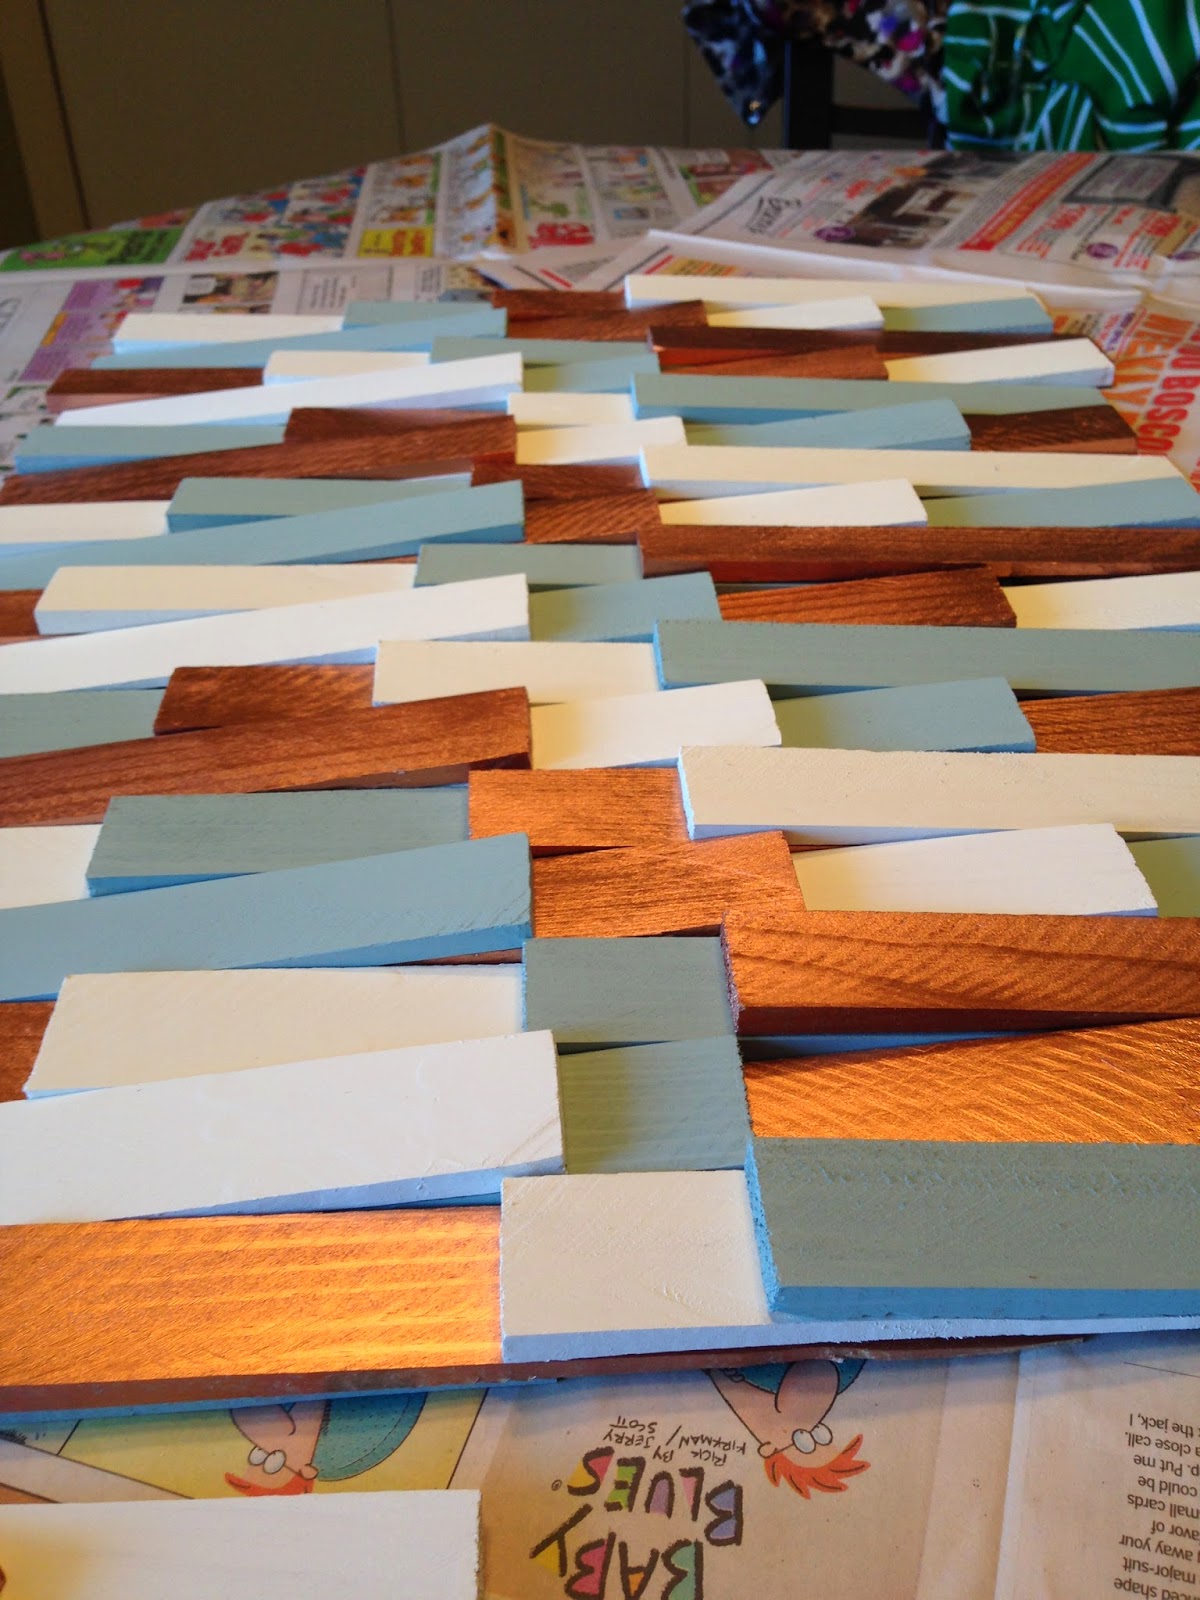
But first, I had to paint my wood shims, which I picked up at the hardware store for about 12 bucks.  Since I'm trying to bring some blue into the family room, I decided to use the same Country Chic paint that I used on my Upcycled Succulent Planter.  For a metallic accent, I decided to stray a little from my love affair with gold (don't tell), and go for some Rustoleum copper spray paint.  And to keep things light and bright, I painted 1/3 of my wood shims white.  Since I had all the paint that I needed on-hand, all that I had to buy for this project were the wood shims. 


Deciding how to lay my wood shims gave me some trouble.  I really toyed around with the idea of laying the shims randomly, at irregular intervals and without a using a color pattern.  But in the end, I was afraid that my randomness would read as messiness, and that I'd end up tearing the whole thing apart.  So I decided to create a more measured, regular design.

After measuring the frame, I used my questionable math skills to figure out that I could fit four shims in each row, if I laid a new shim every 5 and 3/8th inches and that 18 rows would fit perfectly into the frame.  I also knew that I wanted to lay each row in alternating directions, in order to create some texture. 

To get started, I laid out my rows of shims in the color pattern in which I planned to glue them.  Once I was sure that I liked the way it looked, I cut a template shim exactly 5 and 3/8 inches long, and used it to guide me as I wood-glued each row of shims to each other, each 5 and 3/8 inches apart.  

As you can see, the shims are not yet evenly spaced in this pic.

After waiting several hours for the glue to dry, I stacked each of the 18 rows behind the glass of the frame...only all 18 rows didn't quite fit.  Which is when I realized that my math worked in theory, but because wood shims are not perfectly identical to each other, nor are they perfectly square, that my rows had not stacked as perfectly as I had expected them to....

...Leaving me with the dilemma that 17 rows left me with a gap at the top of my picture frame, while 18 rows just wouldn't fit into the frame.  

So, I used my Mr. M.'s Dremmel Multi-Pro (I love how I'm calling the tools mine now, as if I don't need his assistance pretty much every time I use one) to sand down the width of the 18th row by half an inch or so, and positioned the unfinished edge under the frame, so that it would not be visible from the front....


...and then I just put the original cardboard backing back in place, duct taped it to the back of the frame (why not?!) and hung that baby up on the wall.

It's a little hard to photograph due to the windows directly opposite the wall on which it hangs and the reflective surface of the glass.  I considered leaving the glass out of the frame, but I'm concerned that the shims may not stay in place without the glass there to hold them.

Plus, how would I dust all of those nooks and crannies??


I like how it's bringing some more of the robin's egg blue into the room.  Compared to the oranges, reds and golds in the previous piece of art, it's feeling much more seasonally appropriate.  

I'm kind of considering trying out some brick hanging clips to see if I could hang it on the wall to the right of the window into the kitchen, which would free up this wall space once again.  

Mini gallery wall, perhaps??


We'll see!  For now, it's staying right where it is!


What color would you paint this room??  With all of the windows and stonework, there's not a lot of wall space.  The adjoining room is gray, but it too is set for a repainting (the gray has much more blue in it than I initially realized).

Linking Up At

 photo signature_zps64b784cd.jpg

Wednesday, April 23, 2014

I'm the 1 in 8...

I've been writing and re-writing this post in my head for months now. But every time I go to type it, I get blocked, or chicken out, or change my mind.  

'Cause blogging can be kind of scary, you know?

But I keep coming back to it....which should tell me something.  Either that I'm a chronic over-sharer, or that I feel the need to share my story in the hope that it helps someone else who's going through it.... 


Today is Day 3 of National Infertility Awareness Week. It's also the 1,394th day that Mr. M. and I have been waiting for our baby, putting us among the 1 in 8 couples who have difficulty conceiving.

Which freaking sucks.

 And while I've alluded to infertility on the blog before, this is really my first time discussing the issue head on. I'm not opening up about this in order to gain pity, although I do welcome your prayers. The thing is, infertility can be a really lonely struggle. And I really feel like the only good thing that can come out of this crappy situation is that talking about it will somehow help someone else on the journey feel a little bit less alone.  Because even though infertility is a lonely journey sometimes...
  
You are not alone.
I am here with you.

Are you humming Michael Jackson now?  We're totally friends.

And neither am I, thank goodness. Mr. M is awesome, and I really don't know what I'd do without the camaraderie, advice and hope that comes from those in my life who've been there and especially you fantastic ladies who open up about this infertility BS on your blogs. Your words make me laugh, give me support, and (kind of) keep me from turning into a crazy, obsessed person. 

So to those of you who are in it....hang in there.  Drop me a email, let me know about your blog...I want to connect with you. You people are the ones keeping me sane, after all.

And to those of you who aren't personally affected by infertility....you probably know someone who is.  Be kind to them.  They're fighting a battle every day, just like you are.


I'll be back to the usual decorating/DIY/random thoughts tomorrow!  Only now that I've started this conversation, expect the occasional update tossed in here and there.  I think there's going to be a lot to share in the coming months :)

 photo signature_zps64b784cd.jpg

Sunday, April 20, 2014

Easter Tablescape


Happy Easter guys!  Hope you're having a great holiday, and remembering the reason we celebrate it :)

We are hosting Easter dinner, so I thought I'd pop in quickly while my ham is busy cooking away to show you my Easter tablescape.


As I've mentioned before, I don't go too crazy with holiday decorating.  I'd rather spend my limited time and money on decor that can be used longer than the few weeks leading up to a holiday.  I am branching out and adding some holiday items here and there, but I don't have any Easter decor.  However, you know I love a pretty table, so my goal was to create one with things that I had on hand.  Since the table is black and I have plenty of gold, I thought I'd put together a fun black, white and gold table.

Which reminds me.......remember a few months ago on Instagram when I asked you guys whether I should buy the gorgeous Nate Berkus black or gold tray that I found at Goodwill?


The correct answer was both, people!  
I would have loved to have that gold tray in my tablescape....I'm so sad I didn't bring it home.

What, you don't follow me on Instagram yet?!  
Please do, I obviously need your help.

Now on to the rest of the eye candy...


Happy Easter!

Linking Up At

 photo signature_zps64b784cd.jpg

Friday, April 18, 2014

Friday Favs 39

Happy Friday!  Cheers to a three day weekend (hopefully you're enjoying one too)!


Every year, I swear that I'll do something to make our patio and front poor look more pulled together and inviting.  For the cookouts and gatherings I'll undoubtedly be throwing, I tell myself.  But really it's for me and Mr. M. to sit outside and watch our birds at the bird feeder, which is usually the most action that our patio sees.    Regardless of my reasons,  and despite my best intentions.... each year I fail to bring any sort of design to our outdoor spaces. 


It's not that our outdoor spaces are terrible.  They're not.  But they look sort of haphazard and unintentional...which is exactly what they are.  I don't know what I want to do out there, so I don't do much of anything other than set up my hand-me-down outdoor furniture, throw some plants in a pot and call it a day. 

Ok, so that's not completely accurate.  I do know what I want to do to our outdoor living areas, but  an expanded patio with an area for a pergola,  in-ground pool, and outdoor kitchen and fireplace just aren't happening right now.  Or probably ever. 

So in honor of my ongoing, yet unfulfilled longing for a chic outdoor space, here are some of my favorite (realistic) patio decor inspirations.

Fav #1
Interesting furniture, love all of the greenery.

Fav #2
Love the coastal vibe, and especially the whisky barrel coffee table.


Fav #3
Colorful pillows draw me in every time.  Plus, that table and those chairs are awesome.


Fav #4
I'm digging the centerpiece here, as well as the updated wicker.


Fav #5
Pops of color.  Need I say more?!


Over the next few months, I'll be looking for ways to bring these inspirations into our outdoor decor.  New furniture is just not on the agenda this year, so my challenge is to work with what I have.  Hope I'm up for it!

What do you do to get your outdoor areas ready for spring?!

 photo signature_zps64b784cd.jpg

Wednesday, April 16, 2014

Shabby Chic Flower Headbands

After last week's post about the baby shower baskets that I made in anticipation of the arrival of my triplet nieces and nephew, a few of you emailed me to ask about the headbands I used to decorate the girls' baskets. 

So in case you were wondering, I did make the headbands, and they were so simple (and cheap)!!


I started out by ordering shabby flowers and elastic from Pick Your Plum, which cost a total of $9 for a total of 30 flowers in 15 different colors and 5 colors of elastic.  After setting my materials out on the table, I came up with 6 different color combinations that I liked.

  I used Style Me Classy's measurement guide for determining the length of each headband, and added half an inch to each length of elastic to account for overlap when I hot glued the ends of the elastic together to make a circle. 

Then I used the hot glue gun to glue the flowers into clusters, based upon the color combinations that I had already selected. Once each cluster was securely fastened, I used the hot glue to attach each cluster of flowers to the top of the corresponding elastic band.  

And that was it!  I made 6 matching sets of hand bands, all in the colors of outfits that I can imagine the girls wearing.  Whether they are wearing matching outfits or not, they can coordinate and look fab with cute accessories!


Which is your favorite? I can't choose between the brown/blue or the yellow/gray!  Ooh, and I like the black, white and pink as well...it reminds me of something a ballerina would wear.

Linking Up At
Sweet Haute
Work It Wednesday
Share Your Creativity

 photo signature_zps64b784cd.jpg

Monday, April 14, 2014

When in Doubt....Make it a Planter


Happy Monday!  I had the best weekend.  The spring weather just makes everything better :)

A few weeks ago, I stumbled upon this interesting object at my favorite shopping destination (Goodwill for those of you who are new around here!).....no clue what it was, but I bought it anyway.


It had some cool carving along the sides.....


...and some really pretty blonde wood on the bottom.  It's too bad this lighter wood wasn't on the top...I may not have painted it if that were the case.


Whatever this thing was...I thought it would be a cool planter, and a great opportunity to try out my new Country Chic Paint sample! 


I thought it was pretty cool that County Chic Paint let me try out their paint and wax for free.  I chose Elegance, which is reminiscent of a robin's egg blue, and gold wax in keeping with my Midas tendencies.

You know me and gold....we're besties.  
Can't stop. Won't stop.

Before I could paint though, I had to widen the long hole on the top of the object  in order to be able to fit plants in it.  I mostly leave the power tools to Mr. M. (although I'm slowly learning), but even I can operate the Dremmel MultiPro.


I love that thing.  I used the sanding wheel to widen the opening to fit the roots of  the plants into the container, and then it was on to the paint!  

The best thing about Country Chic Paint is that it requires virtually no prep work. So I was able to skip the sanding and get right to the transformation.  Giving the planter two coats of paint was a snap, because the paint dries really quickly.  And once the paint was fully dry, I added a coat of gold wax, which brought a golden, shimmery finish to my planter. 

Then, I used my old trusty, Martha Steward Liquid Gilding and a small paintbrush to enhance the carvings, which turned out to be my favorite part of the whole project.


I added potting soil, some succulents, and a mini cactus that I bought at the drugstore (who knew??), as well as a few white rocks from the outside of our house to mask the soil and keep it in the container.  Since succulents and cacti require little water, I'm not too worried about water damaging the planter.  I just add a few ice chips to the top every weekend, which is when I water all of my plants, and it seems to be fine.


Right now, this little planter is bringing some life to our coffee table in the family room.  But the blue/gold combo will also look great in our living room, master bedroom, or hall bathroom.  

I see this thing moving around the house as inspiration strikes, and it's versatility has me quite pleased.


Anyone know what it was in the first place, anyway?!

Linking Up At

 photo signature_zps64b784cd.jpg