Monday, September 30, 2013

Cozy-ing Up the Place for Fall

I'm not huge on seasonal decorating, not because I don't love the idea of changing my decor to celebrate all four seasons (and every holiday in between), but mainly because I neither the room to store all of that stuff, nor the extra cash to buy four seasons worth of decor in the first place!  But I am trying to find ways to incorporate fall into our decor, and am hopeful that if I limit the purchasing of new items and 'shop my house', I can find thrifty and non-bulky ways to cozy up the place for fall.


So this weekend, I made some quick changes intended to bring warmth and more of a cozy feel to the family room.  First up, was a re-styling of the built-in bookcases on either side of the TV.  Styling shelves is something I struggle with.  I want to create layered, collected-looking shelves but I also abhor clutter, so trying to walk the line between the two usually results in shelves with which I'm never completely happy.

In case you haven't checked out our family room, here is a look at how they were styled before.  Not bad, but perhaps a little sparse.  Definitely not warm and cozy.


So I dug out some of my hardback books (I don't have many, I prefer paperback....and lately, Kindle), and brought some of the other decor from around the room and began to re-style the shelves.  Some of the books had covers that were a little bright for my purposes, so I covered those with brown paper bags, to tone down the color-factor. I emptied the shelves first and started again from scratch.  My focus was on creating layers of objects, in order to create more warmth, variety and texture.  I stacked books both horizontally and vertically, often using them as a platform to elevate shorter object.  I tried to put my frames in the back of the shelves, and layer shorter, more sculptural items in front. 

For once, I'm pleased with the result!  The shelves feel much more interesting and create a more 'collected' look.  The only drawback is that I pretty much had to empty all of my end tables of decor in order to  accessorize the shelves.  So now the end tables are bare, except for table lamps!  


Next up, I turned my attention to furniture.  I was super-excited to find a TON of brand-new Target decor at Goodwill last week, and picked up an amazing rust-colored, knit-sweater throw by Threshold.  I knew I wanted to use it in the family room, and after playing around with various placements for a while, settled on using it to add texture, color, and warmth to our love seat.  

Between the stone, the throw, and that rug, this area is not lacking for texture.....but I feel like there's always room for more!

And finally, I swapped out the paper shade on one of our table lamps for a Nate Berkus burlap shade that I also bought at Goodwill.  The selection of Target goods was AMAZING, I tell you! I've heard that this can happen at Goodwill, but I've never experienced it myself...until now. I picked this guy up for a cool $8.  Again, I think it's a nice, warmer texture, which feels more fall-like to me.  


Do you decorate for the seasons?  How do you change up your decor for the colder months?

Linking Up At

 photo signature_zps64b784cd.jpg

Friday, September 27, 2013

Friday Favs 10

Wow, this week has flown by!  Hopefully the weekend goes a little slower.  We don't have any plans other than hanging out at the house, sleeping in, working on projects we want to accomplish, which is my favorite kind of weekend.  Yay!

Anyway, here are some things that I'm excited about this week!

Fav #1
The 2013 Parade of Homes, which starts this Saturday.  I've never gone before and have always regretted it.  This year, I'm going no matter what, and I'm so excited!  I can't wait to see what the builders and decorators have to showcase.  I'm hoping that photography is permitted, and if it is, you know I'll break down all of the goods for you in a separate post!  Want to go?  Get more information here.

Fav #2
Schwann's Lemon Raspberry Frozen Yogurt.  OMG.  We are not Schwann's customers, but when a neighbor told me that her church was having a fundraiser, I took the opportunity to browse the catalog for the occasion.  I ordered a few other things, but this frozen yogurt is the standout BY FAR.  It is so good.  I wish they sold it in the grocery store! I'm also realizing that I kinda have a thing for lemon. Who knew?


Fav #3
Dunkin Donuts Pumpkin K-Cups. Sorry for all the food-related favorites.  I guess that's all I have going on this week! We don't have a Dunkin Donuts (or any coffee joints) near our house, but Mr. M. brings them home for me on his way home from work.  One of the many reasons I love him.  That and the fact that he's going to hang Giselle this weekend.  He made his first Dunkin Pumpkin delivery yesterday and it's SO GOOD with my pumpkin spice coffee cream.  Ahh....it makes my mornings so much more pleasant!!


Fav #4
Couch to 5K running program.  I guess this can combat all of the food items in this post.  I love C25K!  It makes building up to running a 5K so manageable.  I've done (and completed) the 9 week program in the past, but have gotten away from running and just started back at it this week. I forgot how much I love it!  If you are a non-runner who is looking to get started, this app is for you!  Read more about the program here, and browse the app store to find the app.  

Fav #5
The return of fall TV.  Finally there is something to watch at night! Here's what I'm looking forward to.


Happy Friday! Hope your weekend is amazing!


Thursday, September 26, 2013

Painting Stripes Tutorial

Before we get started, congrats to Megan M., who is the winner of the Better Homes & Gardens subscription!  Enjoy!!

A few weeks ago, I painted one wall in our spare bedroom with big, bold stripes.  I love the visual interest that stripes provide, and since the wall I chose faces the hallway, it creates a nice focal point when looking into the spare bedroom from the hall area.  I opted to paint the room light gray, with stripes in a darker shade of gray.  I truly thought that painting stripes would be difficult, but it was actually one of the easier projects I have done!  I had envisioned having difficulty getting the lines straight and evenly spaced, but my method worked beautifully!


I started by painting the entire room the base color (pale gray, in my case).  Then, I measured the height of the wall (96 inches).  I knew that I wanted to have seven large stripes, starting and ending with my base color.  That equaled out to 13.7 inches per stripe, which required too much precise measuring for me. So I rounded it down to 13.5 inches per stripe, knowing that if the bottom stripe was slightly wider that it wouldn't be noticeable (or even visible, since the bottom of the wall is mostly blocked by furniture).

I had heard that the best way to paint stripes on a wall was to use long level (several feet long) to keep the lines straight.  But when I checked at the store, long levels cost about $50.  Uh, no. I devised a way to make our medium-sized level (which is about 24 inches long) work just fine.  I didn't want to have to measure 13.5 inches again and again, so I measured 13.5 inches from the top of the level and marked the spot with a strip of painter's tape.

Starting at the top of the wall, I measured 13.5 inches down from the ceiling using my tape line to measure the distance and the leveling bubble to ensure that I was holding the level straight up and down.  I made a tiny pencil mark to mark my place (13.5 inches from the top) at the far left corner of my focal wall. Then, I moved over about three feet (as far as my outstretched arms would let me reach), measured 13.5 inches down from the ceiling again, and made another tiny pencil mark. The part about not making your pencil marks further apart from each other than you can reach with both hands will come in handy in subsequent steps.  I continued, working in 3 foot increments, until I reached the far right end of the wall.  Then, I measured 13.5 inches down from my first row of pencil marks and made a second row, also about 3 feet apart. Basically, you are creating dotted lines that you will use to apply your painter's tape. I continued until I had dotted lines for each of the 6 tape lines I needed.

It looked something like this.

Next, I stretched my painter's tape along the lines, making sure that I aligned the edges exactly where I had made my pencil marks. Since my dots were just an arms width apart, I found it easy to start on the left side of the wall, and stretch the tape straight between dots.  Since the tape is already straight, the result was a perfectly straight tape line that was far easier to achieve than I had imagined!  I had to keep in mind that for the dark gray stripes, I needed to tape outside the area to be painted dark gray.  For the stripes that were to remain light gray, I had to tape within the area that would remain light gray. This process was the same I used when spray painting stripes on my family room curtains.

I also applied tape to the corner portion of the wall adjacent to the focal wall, thereby keeping paint off of those walls as well. 

*Tip for Perfectly Crisp Paint Lines*
After applying tape, paint one layer of your base coat along the tape line. Once dry, follow up with as many layers of your accent color as necessary.  Any paint that bleeds underneath the tape line will be the same color as your base color, and will thus be invisible.  Perfect paint lines!!

I used a foam brush to paint the edges, in order to avoid brush marks, and  then rolled as close to the tape lines as possible. I applied two coats of dark gray paint to each stripe, and removed the tape immediately after painting in order to avoid the tape pulling any of my paint away from the wall.

Sorry for the terrible I-phone pictures.  I'm hesitant to get my fancy camera out when I'm painting or doing a messy project.


I'm so pleased with the results!  Keep in mind that we've done NOTHING but paint in this room.  I didn't even bother to wait for better lighting.  Or stage the room for pictures.  What would I have staged it with?! This room is such a hodge-podge.  But the paint job sure is fab!


What do you think of bold walls?  Would you try stripes?

Linking Up At

 photo signature_zps64b784cd.jpg

Tuesday, September 24, 2013

Crossing Over to the Dark Side....

I've long been a hater on the chalkboard trend.  I don't like the way chalk feels on my hands.  I don't like the mess of chalk dust.  I'm not an artist (like, AT ALL), so I question what I would even put on a chalkboard that would actually look good.

But....I've seen so many cute chalkboard projects that I was sort of revising my opinion. I began to think I might like to have a chalkboard on the side of my refrigerator.  Somewhere to list menus and add seasonal messages.  And then I read Susie Harris' blog post showing how to create easy, DIY chalkboard art that I think I could actually do.  And then I spotted this for $6 at Goodwill:
 And then the deal was pretty much done.  The frame is almost exactly the width of the side of our fridge, and it is also super-light, making me think that heavy duty magnets attached to the back of the frame would hold it to the fridge.

So I'm officially eating my words.  Admitting defeat. Selling out. Crossing over to the dark side.  Project Chalkboard is on, and here's some inspiration....

Six Sisters Stuff created this fun menu chalkboard.  Perhaps posting a weekly menu would inspire me to consistently plan our meals ahead?  I do that sometimes, and I love it, but struggle with consistency.

This red-framed chalkboard from IntrepidIllusions shop on Etsy is awesome, and might be a nice pop of color in our kitchen.  That's the direction I'm leaning, anyway....

I also love the idea of having cute, seasonal art that can be changed throughout the year, like this inspiration from Lori at Living Out Loud......


or Beth at Home Stories A to Z.  Wow, I really love this one.


So yup, I'm definitely giving in the the trend.  Can't wait to show you how it goes!

 photo signature_zps64b784cd.jpg

Monday, September 23, 2013

What We Ate {Mushroom Dip}

Last week, we had a Roadkill Day at work.  Roadkill Day?!  Ew, I know that about half of you are ready to click away from this post, but hold on!  Roadkill Day is our strange name for a potluck lunch at work.  The name pre-dates me, and I'm not exactly sure why it is called that, but trust me when I say that Roadkill Day is awesome.  We all bring our A-game, and the lunch options are fantastic!

So anyway, last Thursday was Roadkill and I didn't know what to make because I was super-busy on Wednesday night and didn't know how I was going to find time to make something delicious in the 15 spare minutes that I had, and since I didn't have a recipe in mind, I hadn't shopped for any specific ingredients.  Meaning I would also need to hit the grocery store. Ugh. I almost decided to skip Roadkill altogether, which is totally unlike me and a testament to how poorly prepared I really was, but then I remembered Mushroom Dip. With only five ingredients (four of which I had on hand), and a five minute prep time, this yummy dip was exactly what I needed!  Granted, the dip's mushroom color makes it not the most photo-worthy, or eye-catching recipe of all time, but I guarantee you it is DELICIOUS!


Mushroom Dip
1/2 cup Parmesan cheese
1 cup shredded cheddar cheese
1 envelope dry Italian dressing
8 oz fresh mushroom (ground in food processor)
3/4 cup mayonnaise

Mix all ingredients together. Pour in baking dish and bake 20 minutes at 350.  Serve with fresh vegetables, pita chips, or any dipping vessel of your choice.  I opted to heat mine in a mini dip-sized crockpot,  and that worked well too.

It's so good, and SOO easy.  What simple and delicious recipes do you have in your back pocket?


 photo signature_zps64b784cd.jpg

Saturday, September 21, 2013

From Goodwill to Gilded

Good morning!  I'm bringing you a rare Saturday post, because I just can't wait until Monday to show you this project that I'm so excited about!  Also, there are just four days left to enter the Better Homes and Gardens subscription giveaway!  Enter through this post. Ok, now on with the project!


It all started with a trip my local Goodwill, where I picked up this cool tray for $5. The unique shape caught my eye immediately, and I knew it would be my next project.  You see, I've been seeking out interesting trays for many of the tables in our house for some time, and have been disappointed in both the selection and the prices I have found.  So for five bucks, bringing this baby home was a no-brainer.


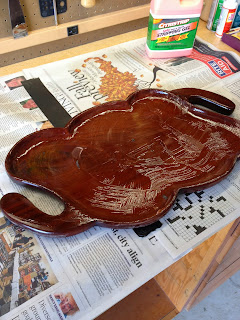
I knew that I wanted to use the tray on our family room coffee table, and I also knew that I wanted part of the the tray to become gold. I've been dying to try gold leafing for EVER, and so I decided that this would be the perfect project to start with.  Because I had never worked with gold leaf before, I wanted to make sure that I prepped the tray properly, in order to increase my chances of success.  This was a project with multiple firsts, so with my husband's guidance, I used wood stripper to remove the finish from the tray.  From this day forward, when someone types 'stripper' in my blog search box, I will now have a result to offer :)

 We used Citristrip, which lived up to its word of being both safe and effective.  I painted a thin layer of stripper on the tray waited about 45 minutes, and then used a plastic scraper to scrape off the finish and some of the stain.  It worked like a charm, and was really easy.    The result:


A tray perfectly prepped for painting.  I painted the entire tray with three layers of glossy black latex paint.  I opted not to prime the tray, which allowed some of the wood-grain texture to peek through the paint.  Check out my high-tech paint stands, aka paper bowls.

Once it was painted, I patiently waited 24 hours before starting my gold leaf experiment.  I bought Mona Lisa's Gold Leaf kit for $11.99, which comes with 25 sheets of gold leaf, as well as a bottle of the necessary adhesive and sealer.

I started by applying a thin layer of adhesive to the areas that I wanted to gold leaf....

...and once it had dried to the point of being tacky, I began to apply my leaf.  To apply, I simply put a sheet of gold leaf on the tray, and used a dry foam brush to smooth it out. Smoothing out the gold leaf perfectly was not possible, but I think that is to be expected.  I think part of the beauty of gold leaf lies in the texture and imperfections. I repeated until the entire tray was covered.
Once the tray was covered I used my dry foam brush to brush away the excess gold leaf.  I used some of the excess flakes to patch any areas that were not covered, as there were a few seams where the black showed through.  From there, I still had a few seams, and I spot-applied a second coat of adhesive to cover those.  I'm not sure that was the best idea, as it left a few areas that were not as smooth as they had been initially.  But, like I said, I think texture and imperfection are part of gold leafing.  Then, I applied sealer to the entire gold-leafed area to protect the leaf from oxidizing, and it was done!

I'm pretty much in love with it. Here's a before and after pic.


And look how amazing it looks in our family room!


I'm still considering applying a coat of shellac to the whole thing to give it a perfectly smooth, glossy finish.  I just need to do some research to make sure that doing so wouldn't damage or react with the gold leaf.  In the meantime, it is looking gorgeous and holding up just fine.

The total cost breakdown for the project is:
Tray- $5
Gold Leaf Kit- $11.99

For a total of $16.99.  Although I only used about half of the gold leafing kit, so if you want to split hairs, I guess you could say it cost about $11.  Either way, it's definitely a thrifty up-cycle!

Have you up-cycled anything lately?  Do tell!


TDC Before and After
 photo signature_zps64b784cd.jpg