Pages

Friday, February 28, 2014

Friday Favs 32

Happy Friday!!  So excited for the start of weekend, not so excited for the snowstorm predicted for the end of the weekend.....will it ever end?!

Anyway, here are my favs of the week!


Fav #1
Check out the Sequoia Console Table from Z Gallerie...isn't it cool?!  Totally out of budget, but a girl can dream...

Fav #2
Keurig Descaling Solution.  We use filtered water in our Keurig,  but were still seeing some build-up and a reduction in the water flow lately.  Enter the Keurig Descaling Solution, which we tried out this week.  OMG.  I hadn't noticed a decline in the taste of my coffee, but the coffee from the newly cleaned machine  was so much better.  

Apparently, you're supposed to de-scale your Keurig every six months or so.  Who knew? (Well...the Keurig manual knew....and after tasting the difference a de-scaled machine makes, I finally believe them).

Find yours here

Fav #3
Cuckoo 4 Design's DIY Abstract Art tutorial.  Maybe it's the abstract design, maybe it's the gold leaf stuck on top (it's probably the gold leaf!), but I so love this!  Julia's tutorial is clear, filled with step-by-step pics, and looks so easy that I'm kind of inspired to try one for myself!


Fav #4
The abundance of tulips bouquets that I've been seeing lately!  I LOVE tulips.  I don't plant many spring flowers in my garden because I hate having to leave the wilted leaves in the ground after the flowers die, but if I did I would certainly choose tulips.  Someday, I'd love to travel to Holland to see their amazing tulips fields...but for now, I'm content to settle for a few stems in vases around the house.  


What's your fav spring flower?  Would you try creating your own abstract art?

Have a great weekend!  


 photo signature_zps64b784cd.jpg

Thursday, February 27, 2014

Creating a Succulent-Moss Planter

I mentioned in this post that I wanted to bring some life into the house using plants, and this week I finally took some steps to make that happen!


Succulents are so great.  Their blue/green/purple hues are so fab and they survive my lackluster plant watering skills.  When I found this bag of moss with shades of purple and chartreuse at Marshall's a few weeks ago, I knew that it would pair beautifully with succulents.  


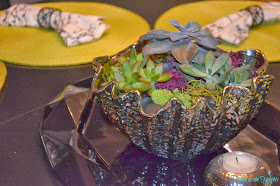
When thinking about creating a succulent-moss planter, I knew that I wanted to use the cool clam-shell shaped bowl that I scored on clearance at Homegoods over the winter.  I've been dying to use this bowl, but haven't found the right filler until now.  I'm so excited to put it to use!

The only other supplies that I needed were succulents, potting soil and a small bag of black river rocks.


I have very few local shopping options, so I just picked up three succulents at Walmart on my way home from work.  The selection was really poor, but I was able to find three different plants that I thought would work.  I varieties I chose were Golden Sedum, Pachyveria 'Royal Flush', and Echeveria.  


When planting succulents, many sources tell you that you should create a potting mix designed to suit the dry-soil preference of the plants by mixing potting soil with sand in order to promote drainage.  

I'm sure they're right. However, I ignored their advice and used plain old pottting soil, which has worked well for the succulents in my office and did not require me to make a mess in the garage. 

I'll keep you posted on how that works out.  

To create the planter, I simple filled the pot halfway with potting soil, plopped in my succulents, and loosely added more soil on top to give the plants the support they needed to remain upright.  I added a layer of river rocks to conceal the soil, and tucked some pieces of my favorite colors of moss in around the plants and under some of the rocks.  


It was really simple.  The entire process took about ten minutes, and made very little mess.  In fact, the hardest part of the whole project was deciding where to put my little planter once I was done!

It looked good EVERYWHERE.

Here is complimenting the purple accent wall in the living room..


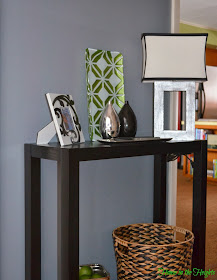
....and accessorizing my favorite little console table in the entryway...


....but I think it has found its home (for now) sitting atop my new black faceted tray on the dining room table.


I'll give you one guess where I found that stunning Nate Berkus tray.....and I'll even give you a hint.  It wasn't Target and I didn't pay the original $30 price for it.  Read my tips for finding such fab finds here.


Has spring fever hit you yet?!  I'm finding myself dreaming up all sorts of spring-like project ideas!

Too bad it's supposed to snow next week :(

Linking Up At

 photo signature_zps64b784cd.jpg

Monday, February 24, 2014

Silver Leaf Lamp Makeover

Monday already?!  I've been spoiled by all of these snow-induced long weekends.  This weekend went FAST.  And while this past weekend may have been gorgeous, the  weather for the weekend before it sucked.  The big Valentine's Day storm created MORE school days that will need to be made up this summer, and kept me stuck inside the house for far too long.  

What did I do with all that time stuck at home, you ask?

Metal leafed stuff, of course.  And watched some One Tree Hill. 

 Duh.


Before I get into the process, let's check out a before pic of my lamp.  This thing has withstood the test of time, I tell you!  I picked it up cheap close to a decade ago, and it has never really had its day in the sun.  It's been in the un-decorated second bedroom of at least three apartments and found its way into the mess that is the spare bedroom in our house.  Which is where it has sat unused for the past four years. Until I bought my fab Goodwill console table, that is. 

Now, it's out and about and in need of a makeover!

The rectangular base was covered with faux-leather with white stitching that was peeling off, but otherwise it was in good shape.  I mean, I assume so....I honestly doubt that it has been switched on in the four-plus years we've lived here.

Maybe I should have checked that before I put the work into beautify-ing this thing?

Also, in true 'Can't Wait to Get Started on My Project' fashion, I forgot to take a true 'Before' pic.  

Oh well. 

You'll have to trust me that this thing had seen better days.


I started by peeling the faux-leather from the wooden base.  Since the leather was peeling to begin with, this was quite easy and all I needed to do was pull it off with my hands.  There was some adhesive left behind, so I cleaned the base and gave it a light sanding.

Then, I painted the entire base using a water-based glossy black paint.  At the time I was undecided if I would distress the silver-leaf finish, but I knew that if I did that I would want black to show through. 

Once the paint was dry, it was time for the silver leaf.  I chose to do this in stages, leafing one surface of the lamp at a time.  First, I painted the surface with adhesive....

Beer optional, but recommended.

...and after it had dried completely, leaving a tacky surface, I applied my silver-leaf.  I used a foam paintbrush to gently smooth the leaf onto the surface.

I was super-excited when it was finally completely covered and fabulous, but the question remained: To distress or not to distress?

I took to Instagram to find out.  


And none of you answered the call.  Which left me stuck to decide for myself....and sort of feeling like a loser.

Anyone? Anyone?  Bueller?


Ultimately, I decided the that finish was just too shiny without any distressing.  

So distress it I did.  I really struggled with choosing a distressing tool.  I was very concerned about scratching the silver leaf.  

In fact, if I had this to do all over again, I think that I would have intentionally left some areas uncovered by silver leaf, creating more of a crackle finish, and eliminating the need for distressing.

Oh well, I guess I just have to leaf something else in order to try that technique out......darn :)

I tried a couple of distressing tools before finding the right one. Thankfully, I tried all of the tools in a discreet location first.  A toothbrush was too soft and didn't rub anything off.  A metal bristle brush from the garage turned out to be way too harsh. 

In the end, I used a clean copper dish scrubber from under the sink.  The copper was Mr. M.'s suggestion, because he thought that it would be the least likely to damage the remaining silver leaf.  I just gave the entire lamp a good scrub with the copper, leaving it worn and scratched all over.  


You can see that the distressing treatment left the finish much more dull and worn-looking.


Which I like quite a bit!  

I wish the lampshade was black with white piping....that may be a future project.

Also, this area really needs a mirror on the wall.  I ordered a black quatrefoil mirror yesterday.  It was only $15, so I'm a little skeptical, but hopefully it turns out to be a keeper.

And maybe the contrast of a black mirror will help me like the white lampshade more?!  Fingers crossed!


What do you think?  Was distressing the right decision?

Bueller?

Linking Up At

 photo signature_zps64b784cd.jpg

Friday, February 21, 2014

Friday Favs 31

What up?  Let's keep this short and sweet.  On to my favorite parts of the week!

Fav #1
Amy from Commona My House shared a free Starbuck's Recipe E-book that I am dying over!  If you're a coffee lover like me, this is like the holy grail.  The Coconut Mocha Cappuccino is calling my name.  While you're there, check out the rest of Amy's blog--she's amazing!


Fav #2
House of Cards is back!  You all know about my love of Netflix, and smart series like HOC is where that love comes from.  Mr. M. and I plowed through season 1 during a long weekend stuck in a hotel next door to our fertility clinic last February, and we've been watching devouring season 2, which was released on Valentine's Day.  You bet your bottom dollar that's how we spent our Valentine's evening (along with crab legs...YUM).  Romantic, I know.

House of Cards' politically driven plot is dramatic and suspenseful, but my favorite part is watching Kevin Spacey deliver Frank Underwood's many, many asides like no nobody's business.


Fav #3
Humorous Bachelor recap blog posts. I've been reading Sheaffer from Pinterest Told Me To's recaps for the past year or so, but my newest discovery is, I'm Not Here to Make Friends.  A friend shared this blog on Facebook this week and it is hilarious.  Imagine hearing a man's snarky commentary on each weekly episode of The Bachelor....

 Oh wait, I already that get from Mr. M. who "doesn't watch it", while he sits on his laptop and annoys entertains me with sarcastic comments about the show each Monday night....


Fav #4
The fact that all of the cats' vet check-up visits are O.V.E.R. for the year.  I took Tony, our garage cat last week (We adopted him when he was 8 or so, and there's no making him an indoor cat now...He does have access to our heated garage), and that trip was fairly easy.

Last night's trip with both Guma and Bron?  Not so much.  Mr. M. was still at work, so I had to handle it by myself.  Not sure I'll ever take them both at the same time again.

The highlights include:

-A house destroyed during the struggle that ensued while trying to get them in their carriers.  Chairs were overturned, blood was shed (mine, not theirs).

- Relentless yowling on the 15 minute drive to the vet's office.

- Realizing during the drive to the office that a nervous kitty dropped both a #1 AND a #2 in the cat carrier on the drive to the office.

-Giving a terrified cat a bath (see above).

-Wet cat on the bed before I could stop him. (see above).

Not our best day.


Are you a Bachelor fan?  I'm sort of ashamed to admit that I love it.  So much drama.

Have a great weekend!!

 photo signature_zps64b784cd.jpg

Wednesday, February 19, 2014

What We Ate {Arroz con Pollo}


I'm so excited to share my recipe for Arroz con Pollo, which is one of my absolute favorites, with you!  I got this recipe from Mr. M's mom, who learned to cook this dish from her mother-in-law, who grew up in Puerto Rico.  So not only is it delicious, it is also authentic!  Plus, it's easy.  

But mostly, it's delicious.  Like....really, really good.


Arroz con Pollo
1 lb. chicken breasts, cut into pieces
1 tsp. oregano
1 tsp. salt
1 tsp. pepper
1/2 cup oil (I use olive oil, and cut it to 1/3 cup)
1 green pepper, cut into 1/2 inch cubes
1/2 cup chopped onion
1 tsp. garlic powder (I prefer fresh garlic)
2 cups rice
1 (28 oz.) can crushed tomatoes
2 cups chicken broth
1/2 cup sliced green olives
1/2 cup chopped pimentos

Preheat oven to 375 degrees. Mix oregano, salt and peper.  Rub onto chicken pieces.  Fry chicken in oil until brown, and then remove from pan.  Add onion and green pepper to pan, fry 5 minutes.  Add dry, uncooked rice and garlic and stir until browned.  Add crushed tomatoes and 1 1/2 cups chicken broth to pan, and bring to a boil. Add chicken back to pan, cover tightly with foil and bake for one hour. 

After baking for one hour, remove pan from oven, add 1/2 cup chicken broth, olives, and pimentos and mix lightly.  Cover tightly and bake 20 minutes more.
  
I like to serve it with a green salad.  This is one of those dishes that seems to taste even better the next day, so don't expect your leftovers to last long!


 photo signature_zps64b784cd.jpg

Sunday, February 16, 2014

Goodwill Hunting


I won't even lie.  I almost backed out on sharing this post because I'm not sure that I'm ready to share the secrets of my success in finding fabulous home accessories with you guys (a.k.a. The Competition).

I told you on Friday, when I shared my best-ever Goodwill finds, that I feel a little competitive when I'm bargain shopping...
Its kind of like that.


But you guys are so good to me! It's really the least I can do.

Plus most of you don't live anywhere near me. So my Goodwill is probably safe. 

Ok, now that I'm done being borderline-funny..here they are!  My secrets to scoring great decor accessories at Goodwill.  In spite of my bad jokes, I really do hope they help you out!  

Tip #1
Stop in often. I'm super lucky that there's a Goodwill store on my route home from work, so it's not out of my way at all to stop in. The stock at Goodwill changes constantly, and stopping in often not only helps you find gems soon after they arrive, but it also helps you learn to distinguish the items that are almost always available from the items that you have to snatch up when you see them.  For example, my local store seems to have an ever-present supply of I-phone and Kindle accessories, so I don't get too excited about those.  But when the Nate Berkus stuff arrives...I'm all over it.


Tip #2
Be on the lookout for salvage items  Goodwill gets salvage items from certain stores (the best one being Target), which means that when the store does not sell an item and wants to get rid of it, they donate it to Goodwill.  These items are brand new, and are usually about one season behind.  I'm generally looking for housewares, but I've also seen salvage shoes, clothing, and accessories (including tons of jewelry!).


Tip #3
Get the savings card.  My Goodwill identifies items by color and letter.  Each week a certain color and letter is on sale for 50% off for savings card holders, which brings Goodwill's already low prices to ridiculously low levels.  I usually have a running 'watch list' of items that I like, but I'm keeping my eye on until they go on sale. If I put an item on my 'watch list' it means that I don't want to pay full Goodwill price for it, but I won't be crushed if someone else buys it in the meantime.

I couldn't wait on these.  I paid $10, which was 80% off than original price.

Tip #4
Learn the schedule of your specific store.  When do they put out new stock?  When do the weekly sales start?  By stopping in at these times, you can be the first to see new items and take advantage of the sales.  Also get to know the workers, so that you can ask them questions about the sale schedule. The people who work at my Goodwill are so sweet!  If I'm eyeing something up that isn't on sale, they'll tell me how long it will be until the the item is scheduled to be on sale, which helps me decide if I want to wait on it.

Tip #5
Go in with an open mind, and be willing to look at what items can become, rather than what they are.  Goodwill is the land of project possibilities for me.  I love to pick up items that I can paint, re-purpose or otherwise transform.  It's the perfect place to find project starters and inspiration. Can that embroidery hoop that costs 49 cents be a wreath form? (Done that.) Could that huge, ugly picture be painted over and transformed into a chalkboard? (Done that too!) Best of all-- if a project from a Goodwill item goes south, I don't have to feel too bad about it because I only spent a few bucks on the materials.


Tip #6
If at all possible, shop alone and when you're not in a hurry.  I find that I really need to have the time to wander around by myself in order to think creatively about the items that I see in the store.  Distractions and time constraints stunt that process for me.


Happy Hunting!!


Friday, February 14, 2014

Friday Favs 30

Happy Friday and Happy Valentine's Day! Hopefully, I'm at work as you're reading this--we've had so many snow days this winter that we'll be going to school until July if we keep it up.

I found the most amazing score at Goodwill this week!  Now if you've been around here for while, you know that this is nothing new...but as I glanced around my house to find the perfect spot for my fab finds, I realized just how many treasures I've scored at Goodwill!  


Fav #1
My amazing score this week was this fantastic pair of lucite lamps.  I first saw them a few weeks ago, and was trying to wait until they went on sale....but when they began haunting my dreams, I knew that I had to pull the trigger before someone else snatched them up!  

I often feel that urgency when I'm Goodwill shopping.  The almost-free prices, combined with the fact that there's typically only one of each item really gives off a 'here today, gone tomorrow' vibe.


Fav #2
The black console table that I'm currently using to simulate a faux-foyer.  Can you believe that I paid less than 10 bucks for this table?!  I'm still working on styling it to perfection, but there's no doubt that the table itself is perfect. 


Fav #3
My knitted throw.  I love layering this over our love seat, and curling up with it on chilly nights!  To think that I almost missed this brand-new beauty because it wasn't in the housewares section of the store...don't worry, I jumped out of the checkout line with the quickness when I spotted it and snatched victory from the jaws of another lady who was eyeing it up defeat.


Fav #4
A versatile gold hurricane.  In the few months since I found this piece, I've already used this it in three different rooms.  It looks amazing everywhere!  I can't wait to fill it with driftwood or shells in the summer months!


Fav #5 (and #6)
Officially, my 5th fav find is the tall, white ceramic vase that I use to balance out my gallery wall.  However, the gold picture frame in the pic is also a steal from Goodwill, and I love it as well!  In fact...I bought five of those.

No shame. 


Have you had any luck at Goodwill?  I'm working on a post with my tips and tricks for scoring such great deals....so stay tuned!

Have a fab weekend!
 photo signature_zps64b784cd.jpg