Showing posts with label holiday. Show all posts

Tuesday, July 1, 2014

Patriotic Mason Jar Vases

Look at me, posting two days in a row!  Hopefully I'm on way to getting back on a more regular blogging schedule :)  Before I get started, don't forget to enter my Blogiversay Giveway!  You can' enter through midnight on July 8th.

I shared this post a few days ago on Sweet Haute, and wanted to share it with any of you who might have missed it!


For me, holiday decorating is all about finding cheap and easy ways to give a nod to the season.  So as the 4th of July approaches, I was excited to utilize a few of the dozens of mason jars that we have around our house to create some patriotic vases for our front porch.

Creating these mason jars couldn't have been easier (or cheaper)!  I used red, white and blue craft paint to paint each jar, and then distressed them with sand paper before topping them off with a jute twine bow and a simple grocery store flower bouquet.  Since I had most of the supplies on hand, all that I needed to purchase was the craft paint ($2.01 for all three) and flowers ($5.99), bringing my grand total to an even eight bucks.  

 photo PatrioticMasonJarVases2_zps0da4d594.jpg

For some variety, I painted one jar white and then used painter's tape and red paint to add stripes....

 photo RedWhiteMasonJar_zps8acbc9d8.jpg

...used toothpicks to dot red and blue paint on top of a white base coat in order to create a confetti effect...

 photo RedWhiteBlueConfettiMasonJar_zps416394e7.jpg

...and left the third jar a simple, distressed navy blue.

 photo BlueMasonJar_zpse7aea716.jpg

Although I did need to wait for the paint to dry between coats, I found that the craft paint dried very quickly and was able to complete the entire project in multiple sittings within the course of one day.  

I set the vases on a wood slice to bring it all together, and it's such a perfect seasonal touch for our front porch!  I've had them out there for well over a week now, and they still look amazing!  More of the flowers have opened, but they still look as fresh as they did the day that I bought them!  I do add water to the vases every few days.  I know that they'll still look great on the 4th of July!

 photo PatrioticMasonJarVases3_zps94991c53.jpg

Cheap, easy, and uses materials that you probably already have on hand.  I can't think of a better project than that! Hope you give them a try!

 photo signature_zps64b784cd.jpg

Thursday, February 6, 2014

Valentine's Day Gold Leaf Plates


As I've said before, I don't go too crazy with holiday decorating.  Especially for non-holidays like Valentine's Day.

 BUT I went a little gold-leaf crazy while I was snowed in this week.  And while I was at it, creating some Valentine's Day art seemed like a good idea.  

Plus, I had some mismatched salad plates laying around. So I had no choice, really.

I love the chippy, imperfect finish that gold leaf produces.  Which is a perfect match for the very imperfect method that I used to create these plates.  I simply used a small paint brush dipped in adhesive to paint a design on each plate, covered the whole thing with gold leaf, and then used an old toothbrush to brush off the excess. Once that was finished, I used the toothbrush to rub off a little more of the gold leaf in order to give the plates a worn look.


I used these unexpected additions to change up my console table decor....


....which might be one of the most difficult places in the house to photograph. Shadows abound.


I think they are kind of fun!

Linking Up At

 photo signature_zps64b784cd.jpg

Tuesday, December 17, 2013

Creating Holiday Cards Using PicMonkey

Related Posts Plugin for WordPress, Blogger...

Have you mailed out Christmas cards yet?  It's not too late!  Mine are hitting the post office today.  As usual, I put the task of creating our Christmas cards off until the last minute. 

Why do I put it off?  Designing and ordering Christmas cards using printing sites is time consuming!  Not to mention expensive!  I've seen gorgeous cards that cost upwards of $1 per card, and at Christmas time, that is just not an expense that I want to add to the list!

Luckily for me, I have discovered the wonder that is PicMonkey this year, and was able to create fun photo-cards in less than an hour!  And with stores now offering web-to-print services, I was able to have those babies in my hand about an hour after that!  It was so easy and fast....I love living in the digital age.


Have you tried PicMonkey yet?!  It's is an amazing, web-based picture editor that novices like me can easily figure out how to use.  Best of all...it's free!  I edit and watermark all of my House in the Heights pics this way. 

Well, unless I'm REALLY tired and rushed to post.  Then I skip editing and give them to you as is.  I'm crazy like that.

Using PicMonkey to create holiday cards is amazingly easy.  Start by clicking on Create a Collage, and selecting a layout for your pictures.  PicMonkey even has layouts entitled 'Cards' to help you find one that will work for you, and you can play around with the layout until it meets your needs.


Next, select the Images tab to drag your photos into the collage.  You can use photos provided or open your own photos from your computer.

Clicking on the Swatches tab allows you to bring pattern and color into your collage.....


...and the Background tab allows you to fill in the space between your pictures with color.

Once you are happy with your photo collage, you will want to switch over to the Photo Editor by clicking on Edit at the top of the page.  Be sure that you are happy with your collage before you do that, because you cannot go back and change or rearrange your pictures or colors once you switch to Edit.  The Photo Editor allows you to add words and embellishments to finish your holiday card. 

Once I was happy with my card, I saved the picture as a JPEG image on my computer.  Since I was in a hurry to get the cards in hand, I chose to upload and print my picture using Walmart's Photo Printing Service.  I was able to upload my picture from home and pick them up an hour later.  This year, I ordered 45 cards, and paid only $.19 each!  I had to purchase my envelopes separately, but at $4.27 for 50 envelopes, I was still very pleased with the price.

The photos were super-cute on their own, but I decided that I wanted to make them a little sturdier, so I opted to mount each photo on cardstock in various shades of green.  I simply cut the cardstock to be 1/4 of an inch smaller than the envelopes, sprayed the back of each photo with some spray adhesive, and stuck them on top of the cardstock.


I thought they turned out to be really fun!  Is it weird that I do photo-cards of my cats?  Whatever.  I think it's hilarious and don't really care.  Some day I'll do kids AND cats.  Or maybe just kids.  Wait and see ;)

I made the front of my envelopes special using a gold paint pen to write the addresses, but I doubt that anyone on my Christmas card list wants their address splashed all over the internet.  So I'll spare you that picture.


But I DID use some fun Christmas washi tape to seal the envelopes on the back.  I thought it would be a fun surprise when people turn the envelopes over. 

And that's it! A great way to create inexpensive holiday cards in an afternoon.  In addition to the cards, I had to buy the envelopes ($4.27), cardstock ($5) and washi tape ($1) , but all said and done, the total cost of cards was just under $20 (plus postage). 

Have you tried PicMonkey yet?  Go now!  You'll love it!

Linking Up At


Monday, December 16, 2013

Holiday in the Heights {Christmas Home Tour}

Related Posts Plugin for WordPress, Blogger...
After weeks of doing a little bit here and a little bit there, our house is about as decorated for Christmas as it's going to get!  I branched out from my less-is-more holiday decoration approach a bit, and came up with some new Christmas decorating ideas this year.

I'm excited to share a tour of our holiday-decorated house with you!  Warning: this post is basically one giant photo bomb.  Enjoy!


Let's start in the family room, shall we?  It is the most decked-out-for-Christmas room in the house, by far. This year, I added a small Christmas tree in here, to showcase the ornaments that Mr. M. and I buy on trips and other special times together.


 We don't have a mantle, so the bulk of our holiday decorating takes place on the shelves surrounding our TV, which is also where we hang our stockings.


I was especially excited about the garland that I created using some gold star ornaments!


I love to have an excuse to break out my red beaded place mats in the dining room!  I love the combination of red and chartreuse with the black and white!


I showed you our Christmas chalkboard last week.  Its' the only holiday decor in our kitchen at this point, but I feel a holiday tablescape coming on, which would bring more of a festive vibe to our kitchen table. I'll be sure to show it to you if it happens!


Our main tree is in the living room, in front of the windows that face the street.  I love that I can see the tree as I drive down the street towards our house!  


I wanted to DIY a tree collar, but I just couldn't find the time this year.  So I felt so lucky to find this fab faux fur tree skirt at Marshall's!  I think it's so pretty with our purple, turquoise and silver tree.

And finally, here are some shots of the exterior. I have to give a shout out to Mr. M. for the outside lights, he did all the work!  


And that's it!  Like I have shared before, I don't go too crazy with my holiday decorating!  With all of the other things going on this month, I'm pleased with what I found the time to do!  

How about you?  Are you done with your holiday decorating yet?  Do you go wild, or keep it simple?

Linking Up At
Give Me the Goods

 photo signature_zps64b784cd.jpg

Thursday, December 12, 2013

Merry Christmas, Ya Filthy Animal

Related Posts Plugin for WordPress, Blogger...


It all started with Home Alone and Home Coming.

 When Kayla shared free printables of some of her favorite holiday movie quotes in this post a few weeks ago, I  printed the Home Alone quote faster than Kevin McAllister could set a booby-trap. 

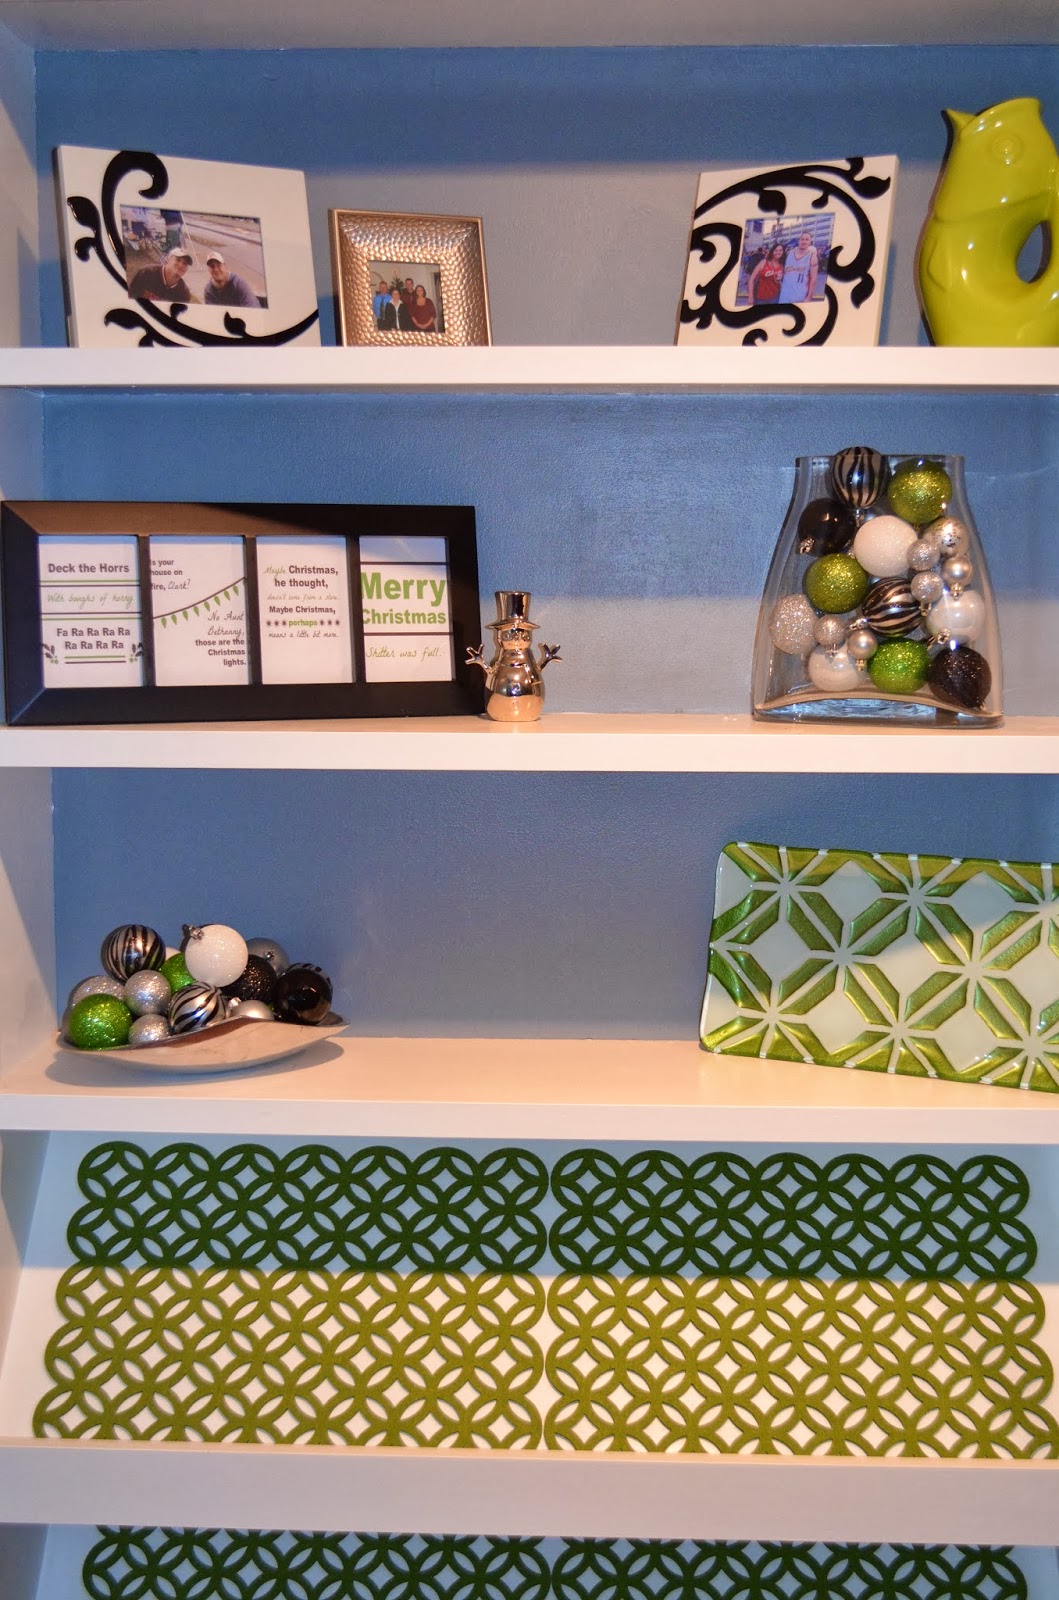
Paired with a frame that I embellished with sparkly washi tape, it looks pretty cool on the console table in our living room. 


But I wanted more.  I wanted Clark Griswold.  I wanted Cousin Eddie.  I wanted The Grinch.  Heck, I wanted a color-scheme that I could use on shelves in the dining room. 
So I created some holiday movie quote printables of my other favorite holiday movies, and of course I'm sharing them with you!

We  have A Christmas Story representing...


And some words of wisdom from The Grinch Who Stole Christmas...

And what list of holiday movie quotes would be complete without some of the one-liners from National Lampoon's Christmas Vacation?


They add some light-hearted holiday fun to our bookshelves!


 photo signature_zps64b784cd.jpg