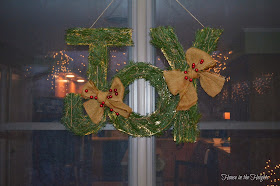
Hey there! I love a good knock-off (especially when it means I can make a JT reference), but what I really love is a free knock-off. So when I saw this cool boxwood wreath that spelled out JOY at Marshall's last weekend, I immediately developed a plan to make it myself.
Once I had the idea, I had to wait a few days to find the right materials. Lucky for me, Mr. M. and I decided to forgo buying Christmas gifts for each other in exchange for snatching up a Cyber-Monday deal on a flat screen that we can both enjoy in our bedroom. It was like three gifts in one! New TV, new space to decorate now that we free up a surface by mounting the TV on the wall, AND I knew that the box it came in would be a perfect template for my new project!
Once we were sure that the TV worked properly, I got right to cutting that baby apart! I knew that I wanted to hang my wreath on the kitchen window, so I cut the word JOY out in reverse, so that the plain cardboard side would be what we could see through the window.
Then, I threw two coats of gold craft paint on the front of the letters, so that letters and pictures on the packaging would not be what peeked through the greens. And by 'threw the paint on', I really mean that I squeezed some paint right on the surface and smeared it around. I didn't really care about my paint job, since it would be getting completely covered up.
 |
| Here it is after one coat. I clearly needed another. |
Then, I cut some more greens from one of our pine trees and hot glued the branches on top of the letters. It took some time and patience to make the branches bend into that shapes that I needed, but it was not hard. I did lose some skin on my fingertips using the hot glue gun.
I contemplated using boxwood greens, like in my inspiration picture, but our boxwood just isn't in need of a trim right now. I thought I might kill it if I cut a bunch of it off in December. So I went with the pine branches, and it worked well! Then, I used my technique for cutting even strips of burlap, and fashioned some bows to tie on top of the letters. I like how they soften the straight edges of the wreath.
When I picked up the wreath to hang it, the weight of the branches threatened to cause the cardboard to fold over on itself. No fear! I just sawed some extra paint sticks that we had laying around and hot glued the pieces to the back of the cardboard in order to fortify the template.
Worked like a charm! Then I glued some twine to the top and hung it using a removable hook. It needed a little somethin' somethin' so I tucked some holly berries from an old wreath into the burlap bows before hanging it outside.
Where it looks fabulous, but the flash from my camera makes the gold on the cardboard jump out at you! It doesn't do that in real-life. I can't see past the pine needles to the gold in person (much like the picture taken in the garage up above). I wish you could see it that way! But...it's pretty much always dark by the time I get home from work. So a flash is a must this time of year. Or I have to get up earlier and be more productive on the weekends.....
Um, no. Sleeping in on the weekends tops all other priorities.
Kidding. Kind of.
Of course that wouldn't have happened had I just painted the letters green. But I didn't have green paint. And gold is fabulous and holiday-appropriate, right?
Right.
Hooray for not one, but two free holiday wreaths on the front porch. And those branches...I dug those out of the woods behind our house.
Hey...I have presents to buy.
See ya tomorrow! I have so many holiday posts, I don't know how I'll fit them all in before Christmas! Cheers to that!
Linking Up At
Work It Wednesday
Get Your DIY On
Linking Up At
Work It Wednesday
Get Your DIY On


No comments:
Post a Comment